Just Made my First Meerschaum Pipe.

Log in

SmokingPipes.com Updates

Watch for Updates Twice a Week

PipesMagazine Approved Sponsor

PipesMagazine Approved Sponsor

PipesMagazine Approved Sponsor

Drucquers Banner

PipesMagazine Approved Sponsor

PipesMagazine Approved Sponsor

Brhumbus

Lurker
Dec 26, 2023
17
74
Northern Nevada
Title edited for caps and brevity. Original:

"Just made my first meerschaum pipe. Not going to wax it, just going to smoke it and see what happens."

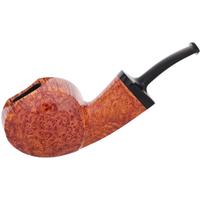
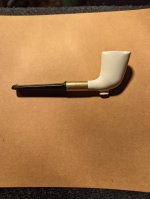
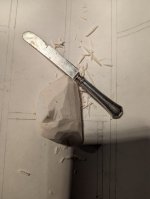
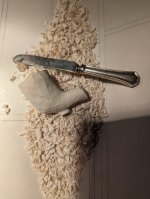
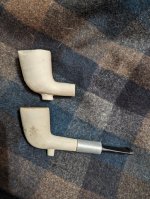
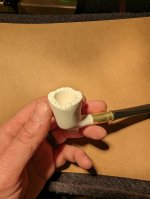
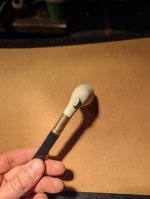
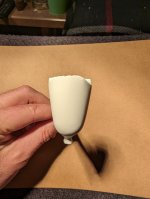
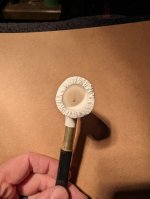
I used a butter knife to carve this meerschaum pipe, including the chamber and a small drill bit for the draft hole. I was trying to replicate an Old German Clay #38. The block I ordered was a little too small to accurately replicate the German clay, so I just got it reasonably close. I used brass tube and a MM corncob stem. Baked it in the oven at 195°f for 1 hour. No wax.

All in all, it's light, smokes well and feels comfortable in the hand. I'm curious to see if it will eventually color or just remain white.
 

Attachments

  • PXL_20240309_041805302.jpg
    PXL_20240309_041805302.jpg
    131.2 KB · Views: 57
  • PXL_20240307_031954961.jpg
    PXL_20240307_031954961.jpg
    84.4 KB · Views: 53
  • PXL_20240307_042732899.jpg
    PXL_20240307_042732899.jpg
    114.7 KB · Views: 51
  • PXL_20240307_055922456.jpg
    PXL_20240307_055922456.jpg
    252.4 KB · Views: 56
  • PXL_20240309_041913866.jpg
    PXL_20240309_041913866.jpg
    138.3 KB · Views: 58
  • PXL_20240309_041856363.MP.jpg
    PXL_20240309_041856363.MP.jpg
    70.3 KB · Views: 53
  • PXL_20240309_041849495.jpg
    PXL_20240309_041849495.jpg
    126.1 KB · Views: 53
  • PXL_20240309_041832959.jpg
    PXL_20240309_041832959.jpg
    105.4 KB · Views: 59
  • PXL_20240309_041817640.jpg
    PXL_20240309_041817640.jpg
    112.4 KB · Views: 59
Last edited by a moderator:

jpmcwjr

Moderator
Staff member
May 12, 2015
24,755
27,361
Carmel Valley, CA
Welcome from California's Central Coast.

Please
put your location in your Profile.
How:
Under your avatar, (top right, left most of three symbols) you choose "Account Details", which brings up "My Account". "My Location" is halfway down. Whatever you're comfortable with- town, city, county, state. province, etc.
 

Brhumbus

Lurker
Dec 26, 2023
17
74
Northern Nevada
I like the rugged plateau look of the rim.

Was that what you had originally envisioned or something that came about by necessity?
I couldn't have a nice flat rim because of the shape of the meerschaum chunk I had. I tried to balance all the things I wanted like bowl height and length of shank.

It looked weird leaving the top smooth and uneven, so I just smacked it a million times with the blade of the knife, lol.
 

Brhumbus

Lurker
Dec 26, 2023
17
74
Northern Nevada
The process was pretty simple. I held up the German clay pipe I had to the meerschaum block and determined where the final shape lived in the block. Made a few pencil marks on the blank block, so I wouldn't forget.

Grabbed a coffee cup full of water and dropped the block in to soak. After about 20 minutes I pulled the block out of the water and was surprised to feel that it was almost slimy, like a wet bar of soap. The knife passed through the material like a bar of soap, so carving was incredibly easy. If at any point the block started to feel "dry" or the knife didn't want to easily remove material I would just drop the block back into the water for 5mins.

After I worked out the general shape I decided to go ahead and make the chamber before refining the final shape. I simply used the rounded tip of the knife and started twisting into the block. It was very quick and easy removing a ¹/16" to an ⅛" of material at a time burrowing into the chamber.

Once I was satisfied with the depth of the chamber I grabbed a small drill bit and going from the center of the end of the shank, slowly twisted it in towards the bowl. This took the longest as the meerschaum quickly clogged the bit and I had to submerge it in the coffee cup and tap it several times to release the clay like meerschaum. Drilling the draft hole took longer than making the chamber.


After I was done with the chamber and the draft hole I continued to refine the shape of the pipe with my knife. Seeing that I lacked material to have the bowl height I wanted And a nice flat top on the bowl I took the knife and gently started tapping the top of the bowl with the edge of the blade. I did this in a variety of directions until I was satisfied with the uniform "ununiform" appearance (lol).

I cut off a piece of brass tubing that was the right diameter to house the MM stem I had and filed it flat on both ends. Then, using a screwing motion, worked the brass onto the end of the meerschaum shank. I also used my knife to assist in gently removing material until the brass was well seated and in line with the shank. I then removed the brass.

This all took about 2-3 hours with frequent breaks to smoke, get coffee, etc.

Then I decided it was at a point that sanding was the next step, so I set the bowl aside on a paper towel to dry overnight. After work I grabbed some 220 grit sandpaper and continued to refine the shape until I was happy. I cut the tenon off the end of the pipe stem and glued it into the brass, rather carelessly because I was eager to finish the project and smoke it, lol.

I put the bowl in an oven safe dish and baked it in the oven at 195°f for about an hour to dry it out. I was surprised upon taking it out of the oven that I could handle it with my bare hands, though I submit that everyone should still use caution, it just didn't feel that hot.

I assembled the bowl with the stem, packed a bowl and smoked!
 

Brhumbus

Lurker
Dec 26, 2023
17
74
Northern Nevada
Once I was satisfied with the depth of the chamber I grabbed a small drill bit and going from the center of the end of the shank, slowly twisted it in towards the bowl. This took the longest as the meerschaum quickly clogged the bit and I had to submerge it in the coffee cup and tap it several times to release the clay like meerschaum. Drilling the draft hole took longer than making the chamber.

I will use an Impact drill bit next time for ease of handling, the impact attachment will make it much easier to drill by hand. I also have a larger block on the way and I intend to take more time with my carving and shaping to get a nicer finished product. I intend on doing the same thing but with a slight bend more akin to a Zulu/cutty.
 

Briarcutter

Starting to Get Obsessed
Aug 17, 2023
180
1,028
U.S.A.
Thanks for everyone's kind replies! I expected a little more criticism! Lol
Well done! I'm certainly not going to criticize you for something I've never attempted! While I've made a few briar pipes, I've never attempted meerschaum, thought about it many times but never took the plunge. Congratulations!
 

Sigmund

Lifer
Sep 17, 2023
1,493
12,791
France
Great looking, but man you had to spend a lot on all that machinery...whats a butter knife go for these days ;)

I kind of liked the carving marks on the outside. You should make a rusticated version if you try it again.