Peterson with a Hole!

Log in

SmokingPipes.com Updates

48 Fresh AKB Meerschaum Pipes
60 Fresh Neerup Pipes
2 Fresh Kent Rasmussen Pipes
12 Fresh BriarWorks Pipes
36 Fresh Brigham Pipes

PipesMagazine Approved Sponsor

PipesMagazine Approved Sponsor

PipesMagazine Approved Sponsor

PipesMagazine Approved Sponsor

PipesMagazine Approved Sponsor

Status
Not open for further replies.

The Mitre

Lurker
May 27, 2022
44
22
73
North Herefordshire, England, UK
Hello everyone,
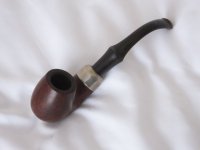
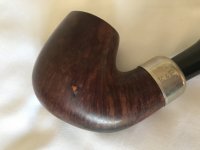
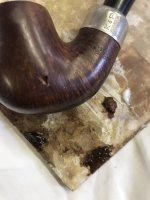
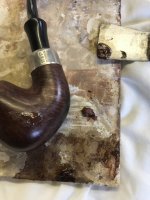
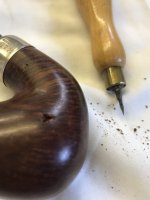
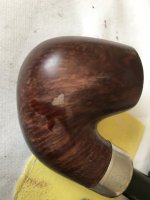
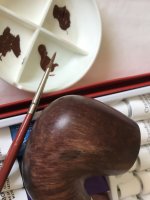
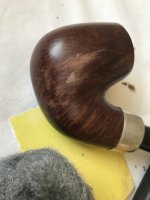
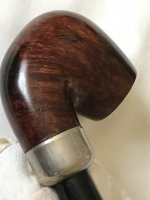
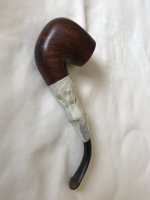
This lovely Peterson System Standard 312 has just come in and has a small defect in the bottom side of the bowl. Under a lens it looks like it might have been a factory fix, with some filler in it, that's failed. As a worker of wood I have no problem in sorting it out but does anyone have any ideas about how this should be done?
Look forward to hearing from you guys.
 

Attachments

  • Peterson Standard 312 (3).JPG
    Peterson Standard 312 (3).JPG
    43.6 KB · Views: 81
  • Peterson Standard 312 (5).JPG
    Peterson Standard 312 (5).JPG
    68.9 KB · Views: 81
  • Sad
Reactions: JOHN72

The Mitre

Lurker
May 27, 2022
44
22
73
North Herefordshire, England, UK
Here you go then, bee brave, I've never done this to a briar pipe before!
Important thing is to get all the loose stuff out and any flaky edges. If you don't the problem will re occur. A sharp, pointed tool will dig out and remove the loose stuff. I decided to use a two part resin filler that I can colour. I use this type of stuff for furniture restorations, it easy to use and can be finished just like wood. I started out with a mahogany colour, this is in the image om the right with the little dab of white hardener. The middle filler has had a walnut colour added and the left one a darker mahogany. In the light the middle one looked best. When you pack the recess make sure the filler is worked well into the cavity and finished a little proud. It will shrink slightly so you don't want to do it again.
Now I had to be patient and let the hardener do its work. I'll be back later on.....
 

Attachments

  • Mixing filler.JPG
    Mixing filler.JPG
    105.2 KB · Views: 35
  • Filled.JPG
    Filled.JPG
    146.8 KB · Views: 35
  • Digging out.JPG
    Digging out.JPG
    91.5 KB · Views: 35

JimPM

Starting to Get Obsessed
Mar 14, 2021
260
1,614
With a little bit of briar dust and a 2 part epoxy mixed together that defect with fill in. Just get a furniture repair marker to shade it to match. Many of the estates that I restore have those. Its a defect that can be easily fixed.
 

The Mitre

Lurker
May 27, 2022
44
22
73
North Herefordshire, England, UK
Thanks John. Yes, I used a two part resin that was already coloured but added some spirit based stain to darken it further and match it in as best I could. Once this mixture had hardened off, and it doesn't take too long, I sanded it back with some fine grit paper. Even with this stuff it left some marks so I then used 0000 grade steel wool to remove these and clean any other impurities from the bowl. At tis stage a wet finger will give you an idea of the final colour, let it dry off before proceeding. Dark wood needs a dark filler and light wood a light one. I know this is obvious but if there is any variation the filler in the dark wood should be slightly darker and slightly lighter in the light wood. This way your eye is not drawn to the defect. Here I decided a little help with some acrylic paint was needed and added a few tiny dark streaks.
I'll be back later to show you how it finished off.....
 

Attachments

  • A little wet.JPG
    A little wet.JPG
    107.4 KB · Views: 25
  • Coloured in.JPG
    Coloured in.JPG
    92.1 KB · Views: 26
  • Cut back.JPG
    Cut back.JPG
    112.4 KB · Views: 25

The Mitre

Lurker
May 27, 2022
44
22
73
North Herefordshire, England, UK
I couldn't, to me it stood out like a sore thumb!

Anyway, here we go. A bit of masking tape around the stem to protect it and then a couple of spray coats of clear lacquer cutting back in between coats and the last one with the 0000 wire wool. A little wax polish, "Rugger Brown" and a good buff up and the jobs done. With patience, all in an afternoon, and not that bad for a first try?
 

Attachments

  • Finished off.JPG
    Finished off.JPG
    97.6 KB · Views: 42
  • First sealer coat.JPG
    First sealer coat.JPG
    82.6 KB · Views: 41

The Mitre

Lurker
May 27, 2022
44
22
73
North Herefordshire, England, UK
Hi there,

Good point, thanks.

There are only three pipes listed currently that I've restored. One is the later Peterson with a repaired crack, I've changed the text on this, and the other is the earlier Peterson churchwarden. This one I've followed the previous replacement amber button that was broken with anew one, I've changed to text to reflect this.

I will be posting this repair shortly because it shows how you can work amber.

Many thanks for this Peter.
 
Status
Not open for further replies.