First Pipe From Scratch

Log in

SmokingPipes.com Updates

New Cigars


PipesMagazine Approved Sponsor

PipesMagazine Approved Sponsor

PipesMagazine Approved Sponsor

PipesMagazine Approved Sponsor

PipesMagazine Approved Sponsor

Status
Not open for further replies.

gerryp

Part of the Furniture Now
Oct 8, 2018
704
2,368
56
Arabi, LA
Previously, I posted pics of the first pipes I carved, both from Vermont Freehand kits.
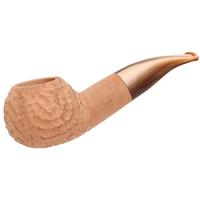
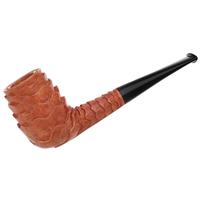
Emboldened by my recent Craigslist purchase, a Craftsman 12" drill press for $100, I ordered an undrilled plateaux block, a bit of Delrin, and a little Cumberland rod, then made this one from the ground up.
The only significant screw up was drilling the chamber about 3/16" too deep, making a dead spot at the bottom. Also, and this isn't necessarily a problem, is that I got too excited about using my new drill press and accidentally grabbed the 1" Forstner bit instead of the 3/4", thus making a big ol' wide chamber. I made the button hole (?) a bit wider to suit my personal preference, making a wide-open airway. The wide chamber and open airway seem to be a good combo.
The bit, combined with the short-ish length, make this the best clencher I own. In keeping with the autumn feel I was going for, it's perfect for keeping your hands free while raking leaves, stealing candy from children, smashing your a-hole neighbors' pumpkins, etc.

IMG_20201115_151030.jpgIMG_20201115_151051.jpgIMG_20201115_151105.jpgIMG_20201115_151116.jpgIMG_20201115_151305.jpg
 

gerryp

Part of the Furniture Now
Oct 8, 2018
704
2,368
56
Arabi, LA
Wow! Great first pipe. What tooling did you need to buy?

Thank you! Other than the drill press, which I didn't need for the kit pipes, I used a couple Forstner bits, a paddle bit that I rounded out with an angle grinder for the chamber bottom, a tapered 5/32 bit for the stem airway, a regular 5/32 bit for the shank airway, a 5/16 bit for the mortise, a cheap pull saw (Home Depot) for cutting some material off the briar block and cutting delrin/ebonite rods, sanding drums for the drill press (Harbor Freight) for rough shaping, a rasp and various files for final shaping, diamond grit needle files (Harbor Freight) for detail work including the button, a two-sided emory board from the nail polish dept. at Dollar General (stem/button work), sandpaper/sanding pads from about 150 grit to 3000 grit, a Dremel for stem work, Fiebing's leather dye, Zinsser (sp. ?) shellac thinned with denatured alcohol, and finally (I think) a bench buffer and a block of carnauba wax. I think that's everything....
 

Mr.Mike

Part of the Furniture Now
Nov 11, 2019
844
2,049
Pennsylvania
Thank you! Other than the drill press, which I didn't need for the kit pipes, I used a couple Forstner bits, a paddle bit that I rounded out with an angle grinder for the chamber bottom, a tapered 5/32 bit for the stem airway, a regular 5/32 bit for the shank airway, a 5/16 bit for the mortise, a cheap pull saw (Home Depot) for cutting some material off the briar block and cutting delrin/ebonite rods, sanding drums for the drill press (Harbor Freight) for rough shaping, a rasp and various files for final shaping, diamond grit needle files (Harbor Freight) for detail work including the button, a two-sided emory board from the nail polish dept. at Dollar General (stem/button work), sandpaper/sanding pads from about 150 grit to 3000 grit, a Dremel for stem work, Fiebing's leather dye, Zinsser (sp. ?) shellac thinned with denatured alcohol, and finally (I think) a bench buffer and a block of carnauba wax. I think that's everything....
Thank you for the complete list. Just goes to show you could do everything with a drill press and make a beautiful pipe!
 

sumusfumus

Part of the Furniture Now
Jul 20, 2017
596
545
New York City
Thank you! Other than the drill press, which I didn't need for the kit pipes, I used a couple Forstner bits, a paddle bit that I rounded out with an angle grinder for the chamber bottom, a tapered 5/32 bit for the stem airway, a regular 5/32 bit for the shank airway, a 5/16 bit for the mortise, a cheap pull saw (Home Depot) for cutting some material off the briar block and cutting delrin/ebonite rods, sanding drums for the drill press (Harbor Freight) for rough shaping, a rasp and various files for final shaping, diamond grit needle files (Harbor Freight) for detail work including the button, a two-sided emory board from the nail polish dept. at Dollar General (stem/button work), sandpaper/sanding pads from about 150 grit to 3000 grit, a Dremel for stem work, Fiebing's leather dye, Zinsser (sp. ?) shellac thinned with denatured alcohol, and finally (I think) a bench buffer and a block of carnauba wax. I think that's everything....
Great work. Love the proportions. Enjoy smoking all your efforts....you earned the kudos. It's amazing what elbow grease can do, even with a minimum of tooling. You proved it.
 
  • Like
Reactions: gerryp

gerryp

Part of the Furniture Now
Oct 8, 2018
704
2,368
56
Arabi, LA
I really like the bright stain and the shaping on that one. That's the kind of pipe I use a lot. It will just come to hand.
Super job, particularly for your first. Well done!
Hoosier: Thanks! I've carved a couple kits before, but this was the first time I've drilled the holes.
MSO: It is very comfortable in the hand, and the stem is the most comfortable of all my pipes.

Thanks again to everyone who "liked" the pipe or posted a compliment.
 
  • Like
Reactions: lightmybriar
Status
Not open for further replies.