The Great Meerschaum Cake Experiment
- Thread starter TheWhale13
- Start date
You are using an out of date browser. It may not display this or other websites correctly.
You should upgrade or use an alternative browser.
You should upgrade or use an alternative browser.
SmokingPipes.com Updates
Watch for Updates Twice a Week
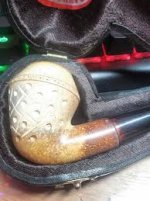
I prefer my pipes' caked up' a little bit, both meers & briars. Just be careful you don't get an 'uneven' cake. Lots of my pipes have a forward cant, resulting in a thicker cake (if you let it) on the back of the bowl. A quick ream, now and then is more than sufficient.Reamed it since the cake was getting a bit too thick and crusty (I don't want to build a cake as impressive as Didi's, but it's big enough to make bowls last shorter than it usually does). But, everything tasted well, and no harm seems to be done to the pipe. It has colored with about the same speed as before too. This makes me confident to build cake in meers and I will continue doing it in the future. I can't say that the experiment is concluded, but at least one round of cake has been completed without injury.
View attachment 207450
And just listening to carvers without smoking experience and believing dogma is really something that can (and should be) questioned and tried. I'm happy that we have people here that is willing to experiment and share their experiences. People like @Said.ALTINAY are very welcome to share their thoughts too, since they have more experience with this than many.
I've seen heavily colored meerschaums that unfortunately broke, and when you look at the inside it was still white. Not as white as the pipe was originally, but very white still. This is because the natural ability of the meerschaum is to express the tars and oils. You could see the carbon in the bowl/chamber, and you could see the color held to the outside of the pipe by the beeswax, and the inside was still white.
Based off the breath smoking video you posted years back, I would think your pipe doesn't get very hot, and where the majority of the color is is where the moisture buildup is likely to be greatest, especially given the way that the smoke is moving back and forth in the shank and stem. Really interesting to see thank you for sharing that. This is definitely above my pay grade but I'm interested to see how the experiment plays out.
People talk alot about these mysterious oils. What I suspect is really the case is there is dirty water from the moisture resulting from smoking, which seeps into the thinner parts of the meer, by the tenon/shank or whatever it is called.
I have observed this with my own meer where the darkest and most amber colouring is where the mouth piece connects to the meer and traps the moisture beetween the stem and bowl. This colour fades as it dries, cleaning the pipe soon after smoking will prevent this colouring in large part, according to my observations.
I would guess that a heavily coloured pipe would be one that has been consistently smoked many times a day over many years, saturating the clay of the meer, and leaving the coloured deposits once the moisture has dried. My pipe definatley colours more if I smoke it more often.
A very simple test of this, and of the porousness and absorption qualities of meershaum, would be to soak a pipe for a few days in a water/food dye mix, then splitting the material to see the inside. One could also fill just the bowl with the dye and see what that produces. Then allow the pipe to dry and see what colour remains.
I don't have a broken meer to try this out, so it's over to anyone hear with an inquisitive and empirical nature.
I may try this on some cigarette holders or on some damaged meerschaum stem extensions.A very simple test of this, and of the porousness and absorption qualities of meershaum, would be to soak a pipe for a few days in a water/food dye mix, then splitting the material to see the inside. One could also fill just the bowl with the dye and see what that produces. Then allow the pipe to dry and see what colour remains.
Often wonder what would happen if meerschaum encountered some black ink or just leaving a pipe soaking in the bottom of a tobacco jar

Why the need for a test? How and why a meerschaum colors has been known for generations, a couple of centuries..A very simple test of this, and of the porousness and absorption qualities of meershaum, would be to soak a pipe for a few days in a water/food dye mix, then splitting the material to see the inside.
That'd show the coloring process of one Meer.<< Snipped bits out >>
A very simple test of this, and of the porousness and absorption qualities of meershaum, would be to soak a pipe for a few days in a water/food dye mix, then splitting the material to see the inside. One could also fill just the bowl with the dye and see what that produces. Then allow the pipe to dry and see what colour remains.
<< Snipped bits out >>.
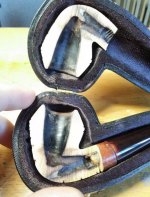
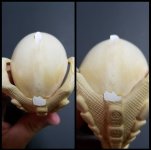
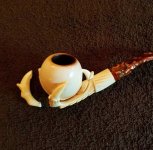
Found these pictures in my Instagram feed from a couple years back. Accidentally broke one of the claws on my CAO Egg and Claw. As you can see, the pipe has some coloring, but where the pipe broke it's completely white inside.


Attachments
YepFound these pictures in my Instagram feed from a couple years back. Accidentally broke one of the claws on my CAO Egg and Claw. As you can see, the pipe has some coloring, but where the pipe broke it's completely white inside.


Soak tobacco in water for a while, then add those to the bowl.
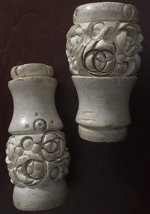
Now that I think of it, I have a small piece just like those! Hmmmmm
That’s an idea but I was also thinking what if left partially submerged in order to observe if the coloring material “climbs” up the meer like a sponge.
That's an even better idea! You should mark the liquid level too, for comparrison!That’s an idea but I was also thinking what if left partially submerged in order to observe if the coloring material “climbs” up the meer like a sponge.
This gives me an idea too....make sure you start a thread on it!
I’m curious of this: internal color wet vs dry. Does it absorb all the way through, then migrate to the outsides leaving a white interior when dry?
Make a new thread soon


