Repairing Cracked Button?

Log in

SmokingPipes.com Updates

9 Fresh Winslow Pipes
18 Fresh AKB Meerschaum Pipes
6 Fresh GH.ZHANG Pipes
6 Fresh Brebbia Pipes
3 Fresh Luiz Lavos Pipes

PipesMagazine Approved Sponsor

PipesMagazine Approved Sponsor

PipesMagazine Approved Sponsor

PipesMagazine Approved Sponsor

PipesMagazine Approved Sponsor

Drucquers Banner

JoeRock97

Lurker
Jul 28, 2024
6
1
Hi everybody!
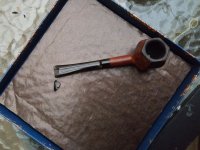
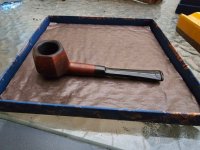
I received an old pipe, which I’ve used for a while and really enjoyed it.

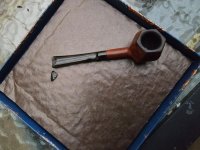
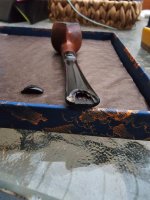
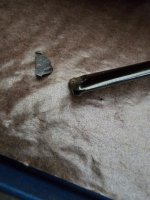
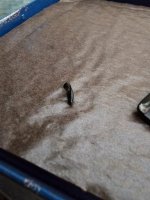
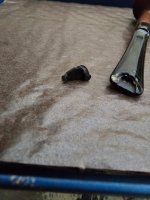
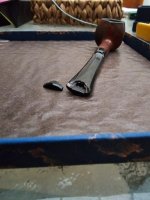
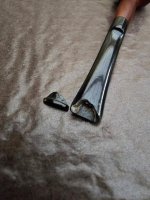
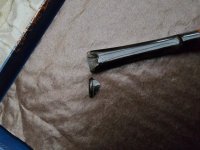
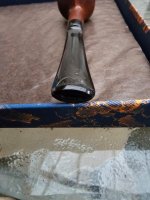
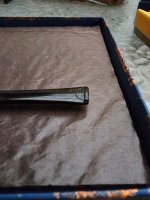
I recently cracked the button of the stem while cleaning it (very stupidly I reckon) which resulted in two separate pieces that complete each other (like a broken drinking glass- the main part, and a chipped part, which complete each other to the full stem).

Now after reading some posts here, watching some videos, and some google searches, I’ve used some 2 stage epoxy, with activated charcoal to try and fix the break.

I’m not so sure of my work, and wanted to get some input on the restoration process- have I made any errors, can you smoke with the epoxy residue in the button, what steps should I take from now, is it possible to restore the stem and continue to use the pipe or should I just get another stem or a whole other pipe?

I am quite new to this and I have much to learn, so any help is very appreciated!
 
Last edited by a moderator:

JoeRock97

Lurker
Jul 28, 2024
6
1
It is best to ask these questions prior to doing anything. Listening to @georged or to @RustiePyles CPG will give you the best advice. If I recall correctly, they don't use epoxy glue on a pipe.
Oof

Yeah I understand. It’s just that all the superglues I found were labeled as to not be in contact with skin.. 😔
plus online the searches said that epoxy is better for these materials..

As you can tell I’m kinda lost in the process 😅
 
  • Like
Reactions: kcghost

Briarcutter

Part of the Furniture Now
Aug 17, 2023
646
4,324
U.S.A.
Oof

Yeah I understand. It’s just that all the superglues I found were labeled as to not be in contact with skin.. 😔
plus online the searches said that epoxy is better for these materials..

As you can tell I’m kinda lost in the process 😅
As far as I know, cyanoacrylate (super glue) is non toxic when dried. You probably want to keep it away from the skin in liquid form though :oops:
 

JoeRock97

Lurker
Jul 28, 2024
6
1
As far as I know, cyanoacrylate (super glue) is non toxic when dried. You probably want to keep it away from the skin in liquid form though :oops:
So would you say I could remove the part and ”re-glue” it using super glue and activated charcoal? And should I?
 

xrundog

Lifer
Oct 23, 2014
1,300
9,212
Ames, IA
So would you say I could remove the part and ”re-glue” it using super glue and activated charcoal? And should I?
Can you remove it? Will all the epoxy come off? I don’t know. Bob Smith industries has some great black rubber formula CA glue. Gluing it, wet sanding smooth and buffing would be the way to go. Breaks at the bit are tough because thats where you put pressure on it. Depends on what the break is like. Even if you do a great job, it might still show. Worth a try though.
 
  • Like
Reactions: JoeRock97

Briarcutter

Part of the Furniture Now
Aug 17, 2023
646
4,324
U.S.A.
So would you say I could remove the part and ”re-glue” it using super glue and activated charcoal? And should I?
If I were in your position I'd make a new mouthpiece or have one made. The break you're describing sounds pretty severe and even if glued will soon fail. I don't have much faith in "glueing" mouthpieces but others here may have good experiences.
 
  • Like
Reactions: JoeRock97

JoeRock97

Lurker
Jul 28, 2024
6
1
Hey everyone, thanks a lot for your responses!

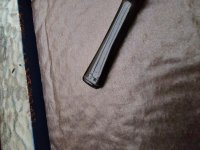
I thought the repair I did with the epoxy worked, but after giving it a real time test I found out it failed 😅.

Not sure if it’s because I didn’t prep the surface with sanding (which I would rather not to do really, because the piece fits perfectly now to its original spot, and after sanding I’m afraid there will be gaps)
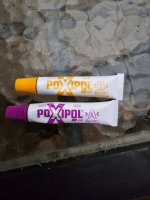
Or if it’s because the brand of epoxy I used (it says it’s good for 120 Celsius).

Not sure how to proceed from here-
Try again with another type of stronger epoxy? Maybe use superglue?

I’ll try to link pictures later (my phone camera isn’t really in good shape)
Thanks again for your help! :)
 

Attachments

  • 9db6b426-1b54-4279-818a-dae1deae9196.jpeg
    9db6b426-1b54-4279-818a-dae1deae9196.jpeg
    155.9 KB · Views: 8
  • 0611785d-68bf-4dbb-b0ab-3882e1880bae.jpeg
    0611785d-68bf-4dbb-b0ab-3882e1880bae.jpeg
    136.2 KB · Views: 7
  • 2728bb81-1a4d-4f5a-9890-249ecd0ab989.jpeg
    2728bb81-1a4d-4f5a-9890-249ecd0ab989.jpeg
    131.6 KB · Views: 6
  • 37ad81a7-d11f-4508-af9d-a78514787abf.jpeg
    37ad81a7-d11f-4508-af9d-a78514787abf.jpeg
    143.1 KB · Views: 6
  • e6978d97-5114-46fd-84b5-d49cb40c6b21.jpeg
    e6978d97-5114-46fd-84b5-d49cb40c6b21.jpeg
    127.2 KB · Views: 6
  • e01555c0-c121-426f-89ae-e0b71765f871.jpeg
    e01555c0-c121-426f-89ae-e0b71765f871.jpeg
    119 KB · Views: 6
  • 722a3d49-0b95-4ca8-bf9a-a5d915983a49.jpeg
    722a3d49-0b95-4ca8-bf9a-a5d915983a49.jpeg
    146.3 KB · Views: 7
  • 76c602ee-e7e0-413c-a635-43c5bc4a5ba4.jpeg
    76c602ee-e7e0-413c-a635-43c5bc4a5ba4.jpeg
    154 KB · Views: 7
  • 6a337dcd-0fc0-4f83-95da-4f6520b8ae58.jpeg
    6a337dcd-0fc0-4f83-95da-4f6520b8ae58.jpeg
    156.2 KB · Views: 7
  • cd6c7b08-f137-43be-a4ed-c143b577f8eb.jpeg
    cd6c7b08-f137-43be-a4ed-c143b577f8eb.jpeg
    150.7 KB · Views: 6
  • c8cba213-907d-44f1-a3e0-612915de7d5f.jpeg
    c8cba213-907d-44f1-a3e0-612915de7d5f.jpeg
    125.9 KB · Views: 6
  • 007dcc36-2dbd-48cd-9b8d-ecb9b9e07d3a.jpeg
    007dcc36-2dbd-48cd-9b8d-ecb9b9e07d3a.jpeg
    128.9 KB · Views: 6
  • 864dc487-d745-42b8-bd73-5b07e5d992ca.jpeg
    864dc487-d745-42b8-bd73-5b07e5d992ca.jpeg
    146.7 KB · Views: 8

JoeRock97

Lurker
Jul 28, 2024
6
1
The epoxy I used (that subsequently failed)
 

Attachments

  • c0366ed2-bb46-49d9-b4ab-17424487cce1.jpeg
    c0366ed2-bb46-49d9-b4ab-17424487cce1.jpeg
    113.2 KB · Views: 2