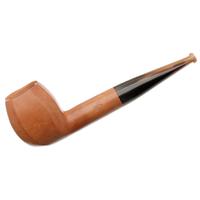
I know to let a pipe cool before removing the stem on regular briar pipes. But for Kaywoodie and other pipes that have the screw-in stems, is it alright to remove it for cleaning immediately after, or even during, smoking? Or should I let it cool like I do my other briars?
Removing Screw-In Stems After Smoking
- Thread starter homesteader
- Start date
You are using an out of date browser. It may not display this or other websites correctly.
You should upgrade or use an alternative browser.
You should upgrade or use an alternative browser.
SmokingPipes.com Updates
- Status
- Not open for further replies.
You can remove them before, during or immediately after smoking. Metal to metal parts don't care.
Just for the record.... you can dismantle ANY pipe before, during and after.
Don't fall for old wives tales.
Just for the record.... you can dismantle ANY pipe before, during and after.
Don't fall for old wives tales.
On a Kaywoodie, the metal collar in the shank is glued in. When warm, the glue can soften, which can throw off the "clocking" of the stem over time if it is removed and then retightened before the glue has had time to cool and tighten. Kaywoodie was aware of this, so they sold their pipes slightly under-clocked new so that the movement over time would actually bring the stem into a correctly clocked position. You're better off letting the pipe cool down before screwing the stem back in.
Thanks, I wondered about the movement being an issue when warm. I've had to adjust a couple I got that were way off.
The following is a post on the topic of clocking Kaywoodie pipes and their construction I saved many years ago. Most of this comes from Bill Feuerback of S. M. Frank & Co, maker of Kaywoodie. I would tend to trust the guy who makes the pipes to know something about them:
The following was posted to alt.smokers.pipes some time back. The first solution was from Mark Tinsky, and the second from Bill Feuerbach of S.M. Frank & Co., Inc, maker of Kaywoodies.
A way to fix it would be to very very slowly heat up the end of the stem. At some point the filter screw will loosen. Turn stem into pipe untill the filter screw stops. At this point you should be back to where you were originally with the stem over turned. Now rotate the stem around until it is in the proper position and let it cool. This should fix it >MT
www.AmSmoke.com Mark, That would work, but on some older Kaywoodies the drinkless attachment is threaded and then epoxied into a bushing that was press fit into the stem. The actual overturn is from the bushing shifting and not the condensor. I've had good results shifting the position of the bushing in the shank. Below is how I do it and its not too hard for guys to do at home. (This is the reply that Mark Wright refers to in his post.)
Overturns: This has long been a problem with Kaywoodies, the result of taking pipe apart and tightening too much when pipe is warm. Actually when we make them, we mount the stem slightly underturned, because in time they will straighten up. There are two ways to fix the problem depending on the age of the pipe. On the older pipes (30's-early 50's), the female bushing in the shank was threaded into the briar. The threads are fairly fine, maybe 20/inch. On this type, the threads on the drinkless attachment go all the way down to the shoulder of the stem and the ball has 4 holes in it. After the early 50's the bushing was press fit into the shank. The o.d. of the bushing on this type has a knurl cut into it to help grip the briar. On this type the threads on the drinkless attachment stop about 1/4" from the shoulder, the ball has 3 holes.
Each type however was held in place with an adhesive to help keep it in proper alignment. I think what happens is that while the pipe is warm the adhesive can get pliable. If the pipe is taken apart to run a pipe cleaner through and reassembled sometimes the bushing can shift. Then as the adhesive resets, it becomes glued in the overturned position. The trick is, if you take the pipe apart while smoking, do not tighten too much while pipe is still warm. Just until its snug.
To do the repair, you will need a heat source that gets red hot, like the coils of an electric stove, or a hot plate. Remove the stem from the pipe. After you determine which type of bushing is in the pipe, try one of the following.
For the older screw in type bushing You will need an Easy Out tool, for removing screws, that fits in the end of the bushing. With the heat source red hot, apply the end of shank, the flat part of the bushing, to the heat for about 10 seconds. Remove from heat. You should see a small wisp of smoke. Quickly insert the Easy Out in the end of the bushing and turn counter clockwise. If it doesn't go, re-apply to heat for 5 seconds and try again.
Be careful because too long of an exposure to the heat can cause the wood behind the bushing to blacken. Also too long exposure to the heat can cause the end of the shank to swell slightly. The Easy Out may put a few dents in the end of the bushing, but it shouldn't interfere when screwing in the stem.
Once you get the bushing out, clean off the loose adhesive from the bushing and from inside the shank. This may also be a good time to clean the goo from inside the shank, but be careful not to scrap down the briar in area where the bushing sits. Now screw the bushing onto the stem. Tighten as much as you can by hand. Next apply a 5 minute 2 part epoxy to the threads of the bushing. Screw the bushing back into the shank, leaving it slightly (5 degrees or so) underturned. Wipe off any excess epoxy that squeezes out.
For the newer knurled type bushing: With the heat source red hot, apply the end of shank, the flat part of the bushing, to the heat for about 10 seconds. Remove from heat. You should see a small wisp of smoke. Quickly screw in the stem all the way, continuing to turn clockwise try pulling the stemand bushing from the shank. If it doesn't go, re-apply to heat for 5 seconds and try again. Screw the bushing onto the stem. Tighten as much as you can by hand. Next apply a 5 minute 2 part epoxy to the knurl of the bushing. Push the bushing back into the shank, leaving it slightly (5 degrees or so) underturned. You may find twisting it in one revolution may help getting it in, make sure the cloverleaf on the stem is correct side and not upside down. Wipe off any excess epoxy that squeezes out. That should work.
If you have an old beat up Kaywoodie, you may want to sacrifice it as a practice pipe. Hope this helps! Bill Feuerbach S.M. Frank & Co., Inc. (Kaywoodie/Yello-Bole/Medico) P.O. Box 789 Peekskill, NY 10566 smokepipes@aol.com www.smfrankcoinc.com
- Status
- Not open for further replies.


