


A couple weeks ago, I posted that a pipe smoking buddy of mine converted a jewelry cabinet to a pipe cabinet. I was wrong! He had the idea, but he never got around to it. I liked the idea so much that I decided to tackle it and thought I would share the results with you folks. A jewelry cabinet works excellently for storing pipes because it has lots of drawers and takes up a relatively small footprint. I also decided to add storage areas to the side wings.Unfortunately I didn't take step photos but I do have some finish photos and will explain the process as best I can. I apologized at the photos are not better, but I think you will get the idea. I still have my Artisan pipes in an open display in my office, but this cabinet is perfect for less showy pipes. Don't hesitate to ask questions if you have any.
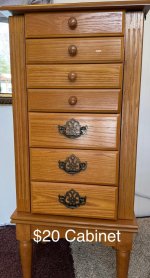
Step 1-buy a jewelry cabinet. I found many for sale on Facebook marketplace ranging from $10-$200. The one I bought cost $20.
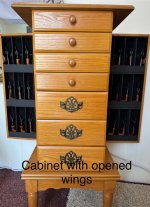
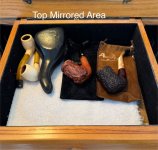
Step 2-(I will refer to the side areas where necklaces are stored as wings)
Remove hooks, etc., from the wing area and remove the ring holders from the top few drawers. I just pried them out with a screwdriver.
Step 3-"paint out"all of the areas that were exposed when you removed the ring holders, etc. I just found a color that was close to the felt
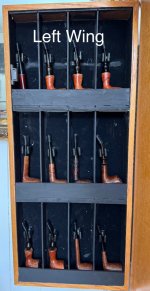
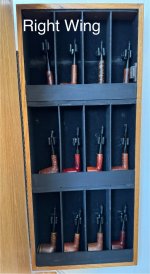
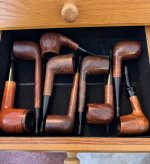
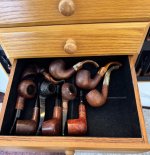
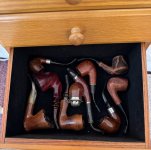
Step 4-construct the pipe cubbies in the wing areas. I built the bottom of each shelf with Birch plywood. I had sitting around my shop. Next, I created the front of each shelf area and the dividers with masonite. I cut shallow channels in the plywood shelf bottoms with my table saw and attached everything by gluing the masonite into those channels. It was really pretty easy I then painted everything black to match the felt.
Step 5-install the stem holders in each cubby. I ordered fishing rod clips from Amazon. I think I got a pack of 40 for $12 and they work great
Step 6- fill your cabinet with pipes and enjoy.
Step 1-buy a jewelry cabinet. I found many for sale on Facebook marketplace ranging from $10-$200. The one I bought cost $20.
Step 2-(I will refer to the side areas where necklaces are stored as wings)
Remove hooks, etc., from the wing area and remove the ring holders from the top few drawers. I just pried them out with a screwdriver.
Step 3-"paint out"all of the areas that were exposed when you removed the ring holders, etc. I just found a color that was close to the felt
Step 4-construct the pipe cubbies in the wing areas. I built the bottom of each shelf with Birch plywood. I had sitting around my shop. Next, I created the front of each shelf area and the dividers with masonite. I cut shallow channels in the plywood shelf bottoms with my table saw and attached everything by gluing the masonite into those channels. It was really pretty easy I then painted everything black to match the felt.
Step 5-install the stem holders in each cubby. I ordered fishing rod clips from Amazon. I think I got a pack of 40 for $12 and they work great
Step 6- fill your cabinet with pipes and enjoy.
Attachments
-
 IMG_1554.jpeg135.4 KB · Views: 17
 -
 IMG_1555.jpeg162.3 KB · Views: 19
 -
 IMG_1556.jpeg111.5 KB · Views: 18
 -
 IMG_1557.jpeg99 KB · Views: 18
 -
 IMG_1564.jpeg106.8 KB · Views: 16
 -
 IMG_1558.jpeg177.5 KB · Views: 15
 -
 IMG_1559.jpeg173.2 KB · Views: 15
 -
 IMG_1561.jpeg191.6 KB · Views: 14
 -
 IMG_1562.jpeg161.1 KB · Views: 16


