I Finally Made a Stem Black Again

Log in

SmokingPipes.com Updates

18 Fresh Nørding Pipes
14 Fresh Brigham Pipes
179 Fresh Peterson Pipes
48 Fresh Vauen Pipes
3 Fresh Wojtek Pastuch Pipes

PipesMagazine Approved Sponsor

PipesMagazine Approved Sponsor

PipesMagazine Approved Sponsor

PipesMagazine Approved Sponsor

PipesMagazine Approved Sponsor

Ryan

Part of the Furniture Now
Sep 30, 2021
621
4,862
Noblesville Indiana USA
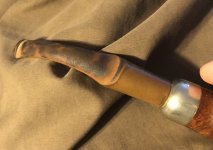
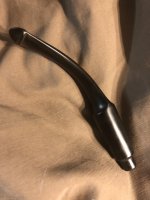
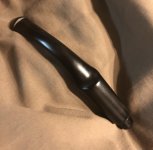
I have seen pipes on rebornpipes.com and here on pipes magazine.com and elsewhere that have nasty stems that become black again, but I had never been fully satisfied when doing it myself. I’m finally satisfied (except for one little thing) with a stem I cleaned. I chose a tough one, I really wasn’t sure if I could get this black again, but I wanted to make a real effort. Here it is:

Before (it looked brighter yellow in person)
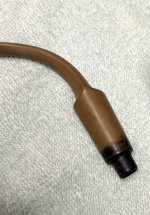
30182B72-2CAC-4270-A59A-2641195997F1.jpeg

During
453BEFCC-25F1-42DD-95D6-A7FADF1EF8BA.jpeg

After
A1E1BFC1-F553-4AB6-B28E-6A13A157244A.jpeg
7D61CA08-4BAC-455D-B6B0-3E5CF785BA9F.jpeg
195D6278-920C-4347-B1C3-B10974F9AEE4.jpeg

The pipe stummel hasn’t been cleaned yet, but I put it on there to show how it looked.

One question though, is there a good way to get the 90 degree crevices right around the button? I tried and tried but never completely got it back to black in those two spots. I was afraid of removing material I didn’t want to remove.

At any rate, I’m pretty satisfied with this stem now. It still needs a bit of polishing and the stummel needs cleaned up, but the stem makes it look a lot better already.

And I learned the trick to getting the stems black again, the secret is time and effort.
 

bluegrassbrian

Your Mom's Favorite Pipe Smoker
Aug 27, 2016
6,675
64,555
41
Louisville
I have seen pipes on rebornpipes.com and here on pipes magazine.com and elsewhere that have nasty stems that become black again, but I had never been fully satisfied when doing it myself. I’m finally satisfied (except for one little thing) with a stem I cleaned. I chose a tough one, I really wasn’t sure if I could get this black again, but I wanted to make a real effort. Here it is:

Before (it looked brighter yellow in person)
View attachment 271472

During
View attachment 271473

After
View attachment 271476
View attachment 271475
View attachment 271474

The pipe stummel hasn’t been cleaned yet, but I put it on there to show how it looked.

One question though, is there a good way to get the 90 degree crevices right around the button? I tried and tried but never completely got it back to black in those two spots. I was afraid of removing material I didn’t want to remove.

At any rate, I’m pretty satisfied with this stem now. It still needs a bit of polishing and the stummel needs cleaned up, but the stem makes it look a lot better already.

And I learned the trick to getting the stems black again, the secret is time and effort.
I've had some luck using little diamond files with 90° edges.
 

Ryan

Part of the Furniture Now
Sep 30, 2021
621
4,862
Noblesville Indiana USA
What method(s) did you use, apologies if I missed it.
I don’t know if my order of operations was correct, but I started by “painting” it with a lighter. Next, I used 600 grit micromesh. Then I went to 1000. After that, I used a magic eraser to attack what was left. I did use obsidian oil between a couple of those last steps.

Last night I looked under a very bright light and saw that there were still a few patches where you could see just a bit of oxidation. I grabbed a 1500 grit micromesh and went to them tonight, followed by the magic eraser again. I followed that with 6000 micromesh and finally 12000 micromesh. I may still lightly buff it tomorrow, but it has a decent shine right now.

Basically I did some of what I have seen on this forum and on the reborn pipes site. I don’t know if I did it quite the way a pro would do it, but I’m very satisfied with the results.
 

Sobrbiker

Lifer
Jan 7, 2023
4,191
54,947
Casa Grande, AZ
First one I got to where I thought it was done came with cramped hands, and a huge sinking feeling when I took it out in the bright sunshine (to take a pic to show how awesome I did, of course), and I saw all the faint brown spots I missed.
If you do try a lighter for the flat part of the bit, tread carefully-I’ve softened and rolled the sharp edge by being impatient and getting too hot too quickly.
I have a MooreMaker diamond coated steel sharpening stone that has a pretty safe edge that I use on the flats sometimes.
 
Jun 9, 2015
3,970
24,852
42
Mission, Ks
Nice work, your getting there!
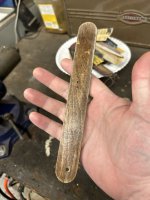
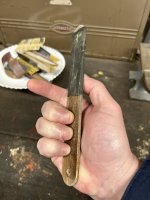
The secret to sanding in front of the button and up to sharp edges while keeping things sharp is using a sanding stick. I make mine by gluing two tongue depressors together, then dressing the edges with a block plane. I lacquer it to make it waterproof. I also stain em just make it look a little more professional. 😉

By gluing two of em together you eliminate the inherent warping in tongue depressors and increase the rigidity enough to put some serious sanding pressure on em. IMG_8928.jpegIMG_8929.jpeg
 

Ryan

Part of the Furniture Now
Sep 30, 2021
621
4,862
Noblesville Indiana USA
Good job on the stem. If you want to see how a pro would do it looks up George Dibos on Facebook and check out one of videos on this problem.
It’s funny, I just watched my first George Dibos video a couple days ago. It was a video about using g-flex for stem fills. I’ll have to watch his video on this subject, thanks for the tip!
 

georged

Lifer
Mar 7, 2013
6,088
16,692
Good job on the stem. If you want to see how a pro would do it looks up George Dibos on Facebook and check out one of videos on this problem.

No Facebook for me. (or anyplace else except here and the pipemakers forum)

If you meant YouTube---which is one way, not back-and-forth---I definitely did some of that when an apprentice fell through (Anthony Cook) and there was no other way to get "behind the curtain" info out there. I made a camera my apprentice, so to speak.

This is the project overview:

https://www.youtube.com/@highgradepiperepairrestora3182/playlists