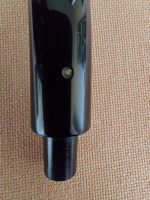
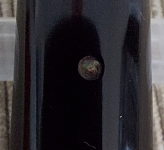
A Horrible Mistake, and How to Fix It
- Thread starter orlandofurioso
- Start date
You are using an out of date browser. It may not display this or other websites correctly.
You should upgrade or use an alternative browser.
You should upgrade or use an alternative browser.
SmokingPipes.com Updates
Watch for Updates Twice a Week
Will send pm
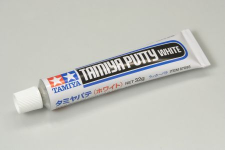
This white grey stuff ?
JB Weld 8277-DEU WaterWeld, speciaal ontwikkelde epoxy kitt-formule voor alles wat met water in contact komt : Amazon.nl: Klussen & gereedschap
JB Weld 8277-DEU WaterWeld, speciaal ontwikkelde epoxy kitt-formule voor alles wat met water in contact komt : Amazon.nl: Klussen & gereedschapwww.amazon.nl
Yes. There is a white outer material and a grey inner. You slice it like cookie dough from roll and then knead it very well. It dries white. You may have to fill it twice and second one overfill then pare down and buff.
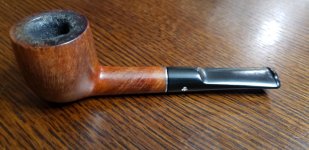
This is a pic of a partially completed resto for a customer. The entire clover was gon. It has one fill and needed another at this point. I rebuffed after the last fill. A smooth deox vulcanite helps to avoid having the material stick to the wrong parts. I don't have a final pic though. I tend to forget about pics trying to get things done. The stem was rather badly oxidized. I use my own formula FDA food certified wax blend and oils for the final buff on the briar and vulcanite. This has only one buff cycle.
The wax blend has no beeswax or carnauba and is certified to FDA food ingredient and food contact 21 cfr 178.3710 and 21 cfr 172.886.Yes. There is a white outer material and a grey inner. You slice it like cookie dough from roll and then knead it very well. It dries white. You may have to fill it twice and second one overfill then pare down and buff.
View attachment 249144
This is a pic of a partially completed resto for a customer. The entire clover was gon. It has one fill and needed another at this point. I rebuffed after the last fill. A smooth deox vulcanite helps to avoid having the material stick to the wrong parts. I don't have a final pic though. I tend to forget about pics trying to get things done. The stem was rather badly oxidized. I use my own formula FDA food certified wax blend and oils for the final buff on the briar and vulcanite. This has only one buff cycle.
Thank you; this looks very, very neatYes. There is a white outer material and a grey inner. You slice it like cookie dough from roll and then knead it very well. It dries white. You may have to fill it twice and second one overfill then pare down and buff.
View attachment 249144
This is a pic of a partially completed resto for a customer. The entire clover was gon. It has one fill and needed another at this point. I rebuffed after the last fill. A smooth deox vulcanite helps to avoid having the material stick to the wrong parts. I don't have a final pic though. I tend to forget about pics trying to get things done. The stem was rather badly oxidized. I use my own formula FDA food certified wax blend and oils for the final buff on the briar and vulcanite. This has only one buff cycle.
How deep is the imprint for the clover and how do you pare down ?
I suppose this stuff cures rock hard.
Never think about taking pictures when refurbishing, it will only distract me from our very delicate works.
The clover is fairly deep about 1/8 inch or so. I fill it first with my thumb and rub it in with pressure very well then wipe off excess completely from a fairly polished stem. Let dry. Takes I think about 5 mins maybe but I leave overnight. Then apply again and leave a small mound very small not high at all. It machines very well. I take a hole punch and punch a hole into painter tape. I place the tape around the clover and then using a 220 hard sanding block and wet sand down until it's flush. Then buff. Start light buff and move to heavy then work back up the scale to final polish. Greaseless compound works great. Muslin floppy style then hard cloth wheel. Then back again. You have to know the grit sequence at this point very well.Thank you; this looks very, very neat
How deep is the imprint for the clover and how do you pare down ?
I suppose this stuff cures rock hard.
Never think about taking pictures when refurbishing, it will only distract me from our very delicate works.
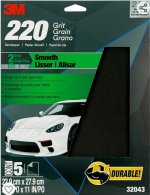
Apologies for all the details just trying to help. Here's the sandpaper. It's not any 220 like for wood its for automotive body. I use a lot of auto body compounds and papers. They work differently and designed for use on glossy things and bondo and stuff like that. From Amazon.The clover is fairly deep about 1/8 inch or so. I fill it first with my thumb and rub it in with pressure very well then wipe off excess completely from a fairly polished stem. Let dry. Takes I think about 5 mins maybe but I leave overnight. Then apply again and leave a small mound very small not high at all. It machines very well. I take a hole punch and punch a hole into painter tape. I place the tape around the clover and then using a 220 hard sanding block and wet sand down until it's flush. Then buff. Start light buff and move to heavy then work back up the scale to final polish. Greaseless compound works great. Muslin floppy style then hard cloth wheel. Then back again. You have to know the grit sequence at this point very well.
This nerdy stuff is what we need on the forum, thank youThe clover is fairly deep about 1/8 inch or so. I fill it first with my thumb and rub it in with pressure very well then wipe off excess completely from a fairly polished stem. Let dry. Takes I think about 5 mins maybe but I leave overnight. Then apply again and leave a small mound very small not high at all. It machines very well. I take a hole punch and punch a hole into painter tape. I place the tape around the clover and then using a 220 hard sanding block and wet sand down until it's flush. Then buff. Start light buff and move to heavy then work back up the scale to final polish. Greaseless compound works great. Muslin floppy style then hard cloth wheel. Then back again. You have to know the grit sequence at this point very well.
Instead of masking tape I use red electricity tape. Punch a 2 mm hole, place it around the dot ( or whatever ) and fill it.
Gain; it is more durable than painters tape and won't take ( most of, test it. ) the fillers , like superglue will not stick to certain plastics. Remove, let cure . Put on a new punched tape and sand away.
My compounds are water based Luxi.
Last edited:
Apologize ? We need you broApologies for all the details just trying to help. Here's the sandpaper. It's not any 220 like for wood its for automotive body. I use a lot of auto body compounds and papers. They work differently and designed for use on glossy things and bondo and stuff like that. From Amazon.
View attachment 249154
I use this type of sandpaper all the time, also emery cloth ( works perfect when used wet ) .
Nail buffers ( blocks and strips ) from 1000 to 4000 grit etc.
Micromesh sheets etc. etc.
For no more than the cost of shipping, I would send it to George since he offered to fix it for free. There's been a lot of pretty dreadful ideas floated here. I personally would not use any of them, I would drill it and replace it. If I couldn't do that I would send it to someone who could. But that's just my personal opinion. Filling it with the wrong material will result in sub-standard results, you really should use the proper material or an acceptable substitute.What is your notion George, can I fix this myself ?
Of course I would accept a so kind and generous offer, but George does not take foreign assignments anymore.For no more than the cost of shipping, I would send it to George since he offered to fix it for free. There's been a lot of pretty dreadful ideas floated here. I personally would not use any of them, I would drill it and replace it. If I couldn't do that I would send it to someone who could. But that's just my personal opinion. Filling it with the wrong material will result in sub-standard results, you really should use the proper material or an acceptable substitute.
To much customs hassle and risk, which I fully understand.
Mayby through a "bypass" . A good friend lives in Port Angelis and we meet on a more or less regular basis
in the Netherlands.
Ah, I see. And totally understand.Of course I would accept a so kind and generous offer, but George does not take foreign assignments anymore.
To much customs hassle and risk, which I fully understand.
Mayby through a "bypass" . A good friend lives in Port Angelis and we meet on a more or less regular basis
in the Netherlands.
And so do I .Ah, I see. And totally understand.
Now contemplating how to organize the bypass
Also for future repairs.


