


I have been wanting to do very detailed and complete restoration post for a while now, but I would either forget to take before and in process photos, or the pipe wasn’t just right. I think this Pete checks most of the boxes, so let’s dive in!
This will be divided into multiple parts, because of the 15 photos limit.
Please excuse any mistakes or missed punctuations.
PART 1
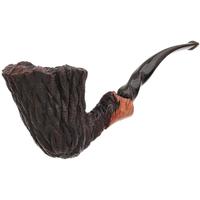
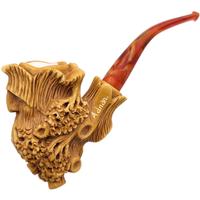
Let’s start with how I got the pipe and some before photos:


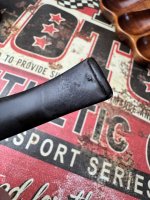
As you can see the pipe has seen better days…It’s generally very dirty and grimy, with all kinds of dents,scuffs and scratches. In addition to all that we have some bite marks on the stem, a possible hole on the underside of the stem, a pretty banged up silver ring and a heavy cake and lava build up.
Now it’s also the time to mention, that I will be restoring this pipe for myself - meaning that I might follow a bit of a different restoration “Code”. I good example would be any darkening on the rim - for my pipes I would get rid of any damaged material, but not always go for completely taking out all blackening, it’s just not worth the material loss in my opinion and I don’t mind it. Also I actually like my older pipes to have some marks of time on them and not to look brand new.
With that out of the way, the first step was to unblock the airway and to fill the pipe with cotton pads and alcohol and let it sit soak for a night. I also put an alcohol drenched pipe cleaner in the stem for a night too. In the beginning I was using the very popular salt and alcohol method, but cotton pads give me the same result, without being so messy.
Of course I forgot to take photos of this first step, but you can imagine how it looked.
Next morning I reamed out all the looser cake with multiple different tools - 2x pipe tool knives, a senior reamer and a Key reamer from Vauen.

Once that was done I still had some very hard cake left, so I just repeated the cotton alcohol step but this time I let it sit for not more than 30 minutes.

When I restore pipes for selling or for other people, I like to leave a thin layer of carbon on the sides of the chamber and even a thicker layer on the bottom(this could potentially prevent a newly from damaging the wood by overreaming), unless I suspect some damage to inside of the chamber. In this case I decided to take it all out and used a 240 and then 400 grit sandpaper to smooth everything out. This genuinely makes a giant difference it the taste of the pipe afterwards. Photos of the inside of the chamber come later.
After cleaning the surface of the pipe with alcohol I could finally see what I was dealing with and was able to form a plan.


I could already see small but very defined dings on the side of the rim, the bottom of the pipe and a cluster on the left side. At this point it is still very hard to see any of the more blunt damages the pipe sustained through the years, but we will get there at a later point. The plan for now was to smooth the well defined spots but not get rid of them completely if it can be helped, The silver had no structural damage so I will be cleaning, polishing and maybe softening some of the scuffs - a full repair is not impossible, but would require skills, time and experience I don’t have at this point of time, also it would be worth only for a very special or valuable pipe.
Time to look at the rim - time to clean the lava off and also there were multiple dents along the edge, that I will be trying to completely get rid of.
First I just slightly brushed it with sandpaper to break the seal and then put some strong gel wood cleaner.


This stuff is very very potent and shouldn’t be left for long. In this case I left it for about 20 minutes.
Continues in Part 2…
This will be divided into multiple parts, because of the 15 photos limit.
Please excuse any mistakes or missed punctuations.
PART 1
Let’s start with how I got the pipe and some before photos:
As you can see the pipe has seen better days…It’s generally very dirty and grimy, with all kinds of dents,scuffs and scratches. In addition to all that we have some bite marks on the stem, a possible hole on the underside of the stem, a pretty banged up silver ring and a heavy cake and lava build up.
Now it’s also the time to mention, that I will be restoring this pipe for myself - meaning that I might follow a bit of a different restoration “Code”. I good example would be any darkening on the rim - for my pipes I would get rid of any damaged material, but not always go for completely taking out all blackening, it’s just not worth the material loss in my opinion and I don’t mind it. Also I actually like my older pipes to have some marks of time on them and not to look brand new.
With that out of the way, the first step was to unblock the airway and to fill the pipe with cotton pads and alcohol and let it sit soak for a night. I also put an alcohol drenched pipe cleaner in the stem for a night too. In the beginning I was using the very popular salt and alcohol method, but cotton pads give me the same result, without being so messy.
Of course I forgot to take photos of this first step, but you can imagine how it looked.
Next morning I reamed out all the looser cake with multiple different tools - 2x pipe tool knives, a senior reamer and a Key reamer from Vauen.
Once that was done I still had some very hard cake left, so I just repeated the cotton alcohol step but this time I let it sit for not more than 30 minutes.
When I restore pipes for selling or for other people, I like to leave a thin layer of carbon on the sides of the chamber and even a thicker layer on the bottom(this could potentially prevent a newly from damaging the wood by overreaming), unless I suspect some damage to inside of the chamber. In this case I decided to take it all out and used a 240 and then 400 grit sandpaper to smooth everything out. This genuinely makes a giant difference it the taste of the pipe afterwards. Photos of the inside of the chamber come later.
After cleaning the surface of the pipe with alcohol I could finally see what I was dealing with and was able to form a plan.
I could already see small but very defined dings on the side of the rim, the bottom of the pipe and a cluster on the left side. At this point it is still very hard to see any of the more blunt damages the pipe sustained through the years, but we will get there at a later point. The plan for now was to smooth the well defined spots but not get rid of them completely if it can be helped, The silver had no structural damage so I will be cleaning, polishing and maybe softening some of the scuffs - a full repair is not impossible, but would require skills, time and experience I don’t have at this point of time, also it would be worth only for a very special or valuable pipe.
Time to look at the rim - time to clean the lava off and also there were multiple dents along the edge, that I will be trying to completely get rid of.
First I just slightly brushed it with sandpaper to break the seal and then put some strong gel wood cleaner.
This stuff is very very potent and shouldn’t be left for long. In this case I left it for about 20 minutes.
Continues in Part 2…
Attachments
Last edited:


