1942 Dunhill estate restoration questions

Log in

SmokingPipes.com Updates

Watch for Updates Twice a Week

PipesMagazine Approved Sponsor

PipesMagazine Approved Sponsor

PipesMagazine Approved Sponsor

PipesMagazine Approved Sponsor

PipesMagazine Approved Sponsor

Status
Not open for further replies.

wagnon85

Might Stick Around
Apr 25, 2010
72
0
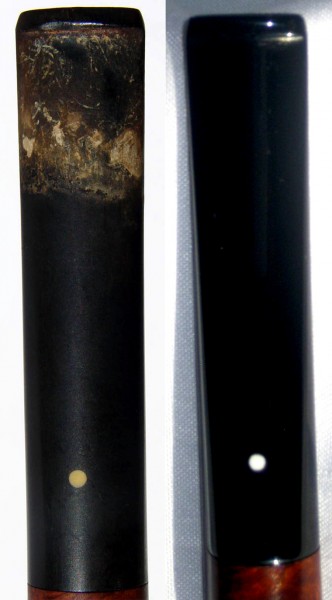
I do have a question for any of you that might know...when I started doing the wet MicroMesh process on the stem I noticed the water turning brown as I sanded. And it kept doing it the more I sanded. Now I was using the lowest grit MM, but that's about 1500 grit so it's not taking much off.
However, I do wonder when the brown water will stop? Is the brown water just myself stripping the oxidation off? If so I'd have to keep going until the oxidation is removed and I am down to the good stuff right? Or should I have let the stem soak in bleach longer (it wasn't rough when I took it out)?
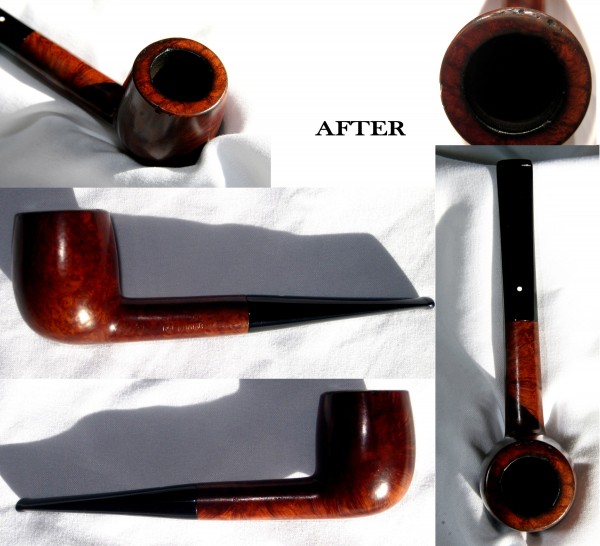
On the other hand, the rest of the stem looks great, and is mostly a uniform color.
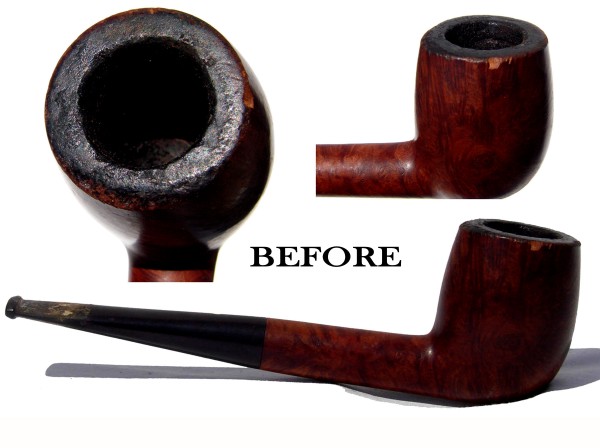
I have restored a stem previously, but it was only a few years worth of oxidation and use, not 70, so it didn't take much work! hehe That was basically an hour soaking in bleach, some micromeshing, and a little polishing and that was as good as new.


ssjones

Moderator
Staff member
May 11, 2011
18,745
12,178
Maryland
postimg.cc
Yeah, that oxidation can be stubborn. You are keeping the stem on the pipe while you sand right? (if not, you'll round the edge of the stem) I usually come back to a stem the next day, to see what I missed. Unless you get the brown to stop, the oxidation will come back pretty quickly. This is where a buffer with some Tripoli is helpful. I'd get some wet 1000 grit paper to get that heavy stuff off, than 1500 and 2000 before moving to the micromesh. I just do the final three grades at that point, 6000>8000>12000.


deleon

Part of the Furniture Now
Nov 7, 2011
663
219
Texas
My 2 cents
For the stem I would go the oxyclean route. Vaseline will protect the dot but its best to keep checking on the dot to make sure the Vaseline stays and not rub off with the oxyclean. What I do when cleaning the stem depending how deep the scratches are I wet sand the stem with 600, 800, 2000 grit and that does a good job before polishing.
The cake removal, if you’re planning on giving the pipe a new paint job I would use a soft brush with warm water that usually removes all the top buildup, then I finish off with a q-tip. If it’s really bad start with some 600 grit and lightly sand it but keep checking to make sure you don’t mess the wood up.
Cleaning out the bowl you’re on the right track, just going to take some time ( I hate waiting myself). If you’re going to and the entire pipe for a new paint job, I would wipe it down with alcohol first then start sanding the darkest areas first to match the lighter areas, then start giving it a smooth finish with higher grit sandpaper. You can use Fiebing Leather Dye, maybe a medium brown from what I can see in the pictures to come to a close match.
Good luck restoring your Dunhil!

:D


wagnon85

Might Stick Around
Apr 25, 2010
72
0
Ok guys, I have finished my first restoration project...I am pretty happy with it, but let me know what you guys think. I did pretty much everything detailed above, including leaving the missing chunk and dings and other "character" items...just felt right for a 70 year old pipe. I did lightly sand away the excessive cake on the rim, and very slightly round the edges of the rim, but for the most part tried to leave the structure of the pipe as is.
I had got it all done and like the way it looked, and then thought, you know I do have a three wheel buffing system for my lathe, including the appropriate media to put on it, finishing with the bee's wax...so I thought what the hell? Liked the way it turned out so much, I threw the rest of my pipes on it! hehe
Anyway, without further adieu, I have a before and after collage and a comparison of the stems:
before-collage-600x448.jpg

after-collage-600x546.jpg

stem-comparison-332x600.jpg


twangthang

Can't Leave
Sep 15, 2012
358
44
That pipe came out awesome! I am sure it will have a whole new life!

The grain is beautiful! Please let us know how it smokes.

Jim


wagnon85

Might Stick Around
Apr 25, 2010
72
0
Thanks, I appreciate that!
And I forgot to mention that part...I haven't smoked it yet...but that's next on the list!


ssjones

Moderator
Staff member
May 11, 2011
18,745
12,178
Maryland
postimg.cc
Wow, what a great job. I like the patina that is left, it fits and gives the pipe character. It looks like you rounded the stem edge slightly, you have to finish the end of the stem with it on the briar (I learned that lesson too). She looks ready for another 60 years of careful use!
I also like your photo collage, that is a great idea.
Enjoy the fruits of your labor.


mlyvers

Can't Leave
Sep 23, 2012
487
0
great job wagnon85. i hope that dunhill smokes as good as it looks. AL has great ideas on refurbs, he does many his self. i like to refurb charatans. i know AL like comoys. again GREAT JOB SIR.
mike.


wagnon85

Might Stick Around
Apr 25, 2010
72
0
I moved this over to a "new" pipe thread...and I posted this in that thread as well:
Just gave the pipe a smoke, seemed only natural to load it up with some Dunhill Nightcap, and I have to report that it smoked very nicely. It smoked nice and cool and stayed lit, just needing occasional tapping, for that middle section (between the char light and the end). And being a Group 2, it's probably my smallest pipe, and smallest bowl, so it's nice for when you only have a little while to puff away.
But all in all, no odd flavor or smell from its previous life, nor from the restoration process...so yah! hehe


cajundad

Can't Leave
Nov 1, 2012
468
1
Louisiana
what did you use to stain your bowl , what process did u use to polish after staining it ? beautiful old pipe BTW .

 
Status
Not open for further replies.