
So I'm new to pipes, but I'm a quick learner, and I'm not afraid to get dirty. I've had a chance to get my hands on a few estate pipes that needed some love. I have found a vast and friendly community, happy to share their experiences, and have learned a great deal. I wanted to contribute my own novice experience to this mix. While I wouldn't describe what I did here as a "restoration" per se, as it was not a complete overhaul, it could be termed that depending on your definition.
I've only had my hands on a couple of the poop-ton of different methodologies that others describe, and have managed to find success early on in my experimentation. There are pros and cons to my process, and I love the fact that no matter how excellent one gets at this, there is ALWAYS room to improve, and no two jobs will ever be identical! This is a great, rewarding hobby, and to me, performing all of the steps by hand, and without machinery is all part of the enjoyment. Takes longer, but I'm not exactly paying myself an hourly rate here. I work with devices all day, every day, and I like them very much, but I also appreciate manual process and the feeling of solid tools and aged briar in my hands.
Enough of that, on to the pipe:
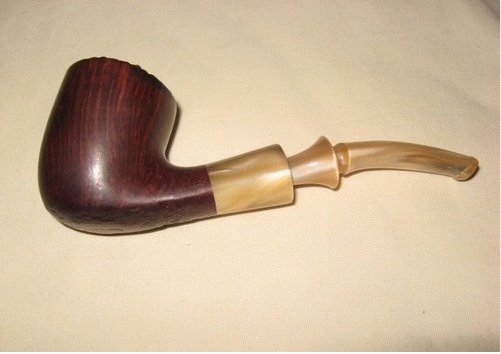
I am attracted to a history more than I am to expensive, higher class pipes. (not that I don't also desire those rare and expensive beauties we all drool at when we see them in magazines and photos). This Savinelli Oscar fit nicely into my tastes. Not priceless, not rare, inexpensive, and had a story - the seller was liquidating some collectables from her father and her husband that were ready for new homes. Among that collection was this pipe. Now, accurately dating a Sav isn't really possible, but this one can be placed into a date range that includes part of the 1950s, into the early 1960s as the owner only smoked during that time, but kept his pipes on display between then and now.
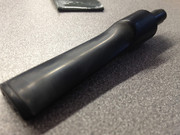
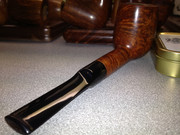
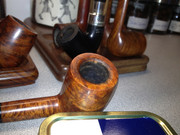
Here is what it looked like when I received it:
(click on thumbnails for larger versions)
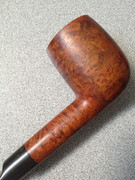

...not that bad.
Typical cake in the bowl, slight charring on the rim, stem oxidized pretty badly.
But not that bad.
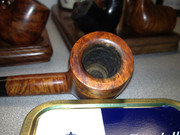
I went to work first on reaming the bowl. My preference is to remove the majority of the cake, until the first signs of briar reveal themselves, and begin with a smooth, even surface to smoke from. I don't use a retort, nor do I salt/alcohol treat the bowls. My feeling is that this piece has a history and a past that it is not my right to erase. I prefer to respect that history by leaving any ghosts that live there to leave in their own good time rather than forcefully evicting them without a moments notice. A few smokes and they will ease themselves peacefully into a new existence, and if they stubbornly refuse to leave, then hey, that's all a part of the historical record. I'll find something to smoke in it that suits the ghosts well.

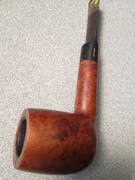
Minor cake buildup, not a problem.
Easily taken care of with a combination of Senior reamer, buttner reamer, and pipe knife. I like to combine the tools to leverage their various strengths rather than trying to rely o one or the other to do a quality job.
While I worked on the reaming, the stem went into the sonic cleaner. The cleaner does a marvellous job on the oxidization and sterilizes the stem all in one step. Like many electronic appliances, they are cheaply available from Asia. I was able to get mine into the house using what I call the "Fred-Flintstone-Bowling-Ball" methodology; let's just say that the Mrs is also very happy with her new jewelry cleaning machine.
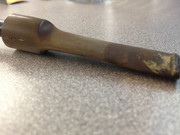
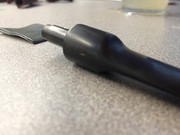
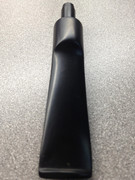
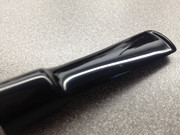
The stem showed typical oxidization, as well as some heavy staining and bite marks. I'm optimistic:

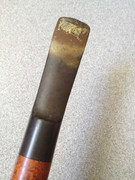
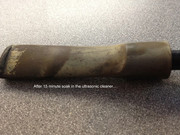

You can see the effect of the sonic cleaning in the photos. Most of the staining was removed, and the ugly green/brown crap is in the same state it would be using a bleach soak, but without the bleach. The logo on the stem looked pretty fragile to me on this pipe, and I didn't like my odds of being able to salvage it, but I was a bit surprised when it all but disappeared in the cleaner. I've done a bunch of stems this way, and never had one fade like that.
Now, there are as many methods of oxidation removal as there are tobacco blends in the world. My preference is light sanding with very fine wet paper, and a lot of patience. I won't rush this process, and I won't use any kind of machine since that increases the risk of permanent damage many fold. As soon as you take away the tactile input, you lose way too much control, and that control is incredibly important in a "destructive" method like this. The drawback of the sanding method is that you are removing material. There is a risk of removing too much, rounding hard edges, creating uneven surfaces, or trashing your logos. I find that an acceptable risk, but I would definitely advise a beginner to practice on a throw away first to get a feel for pressure, direction, time, etc. It is not a difficult process, but it is one that requires an understanding of what is happening, and patience. Many restorers talk of how they are able to complete a stem in 15-20 mins. I usually take 90 minutes or more, but hey, we are talking pipes here. I'm sure you could smoke a bowl of University Flake in 15 mins too, but would you want to?
There is a story of an old carpenter who is teaching a new carpenter the trade, and in showing him how to use the saw, the old carpenter remarks that it is wise to be conservative with cuts. "You can always cut more off, but you can never cut moron" he tells the young man straight faced. I've always liked this bit, and it definitely applies to this method of stem cleaning. I like to start with very fine paper, and work to even finer. Yes, it does make more work and take longer, but again, I'm not paying my bills with this. Since finer abrasives remove material less quickly, there is a reduced risk of irreversible damage occurring, and if it does, it will be far less serious.
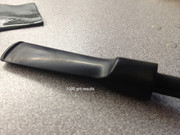
Initial sanding is with 1000 grit wet dry paper, being mindful to rinse the stem and paper often to keep the paper clear. The lip of the mouthpiece is usually the trickiest part. To avoid cross hatching scratches that could result from sanding parallel to the crease, I like to fold the paper and sand along the lip using a circular motion that runs mostly perpendicular to the mouthpiece (along the length of the stem). This step is finished when the stem is rinsed and dried, and only the smallest bit of brown is still visible.
Like this:
I prefer to work on the stem separated from the bowl. It makes the stem a bit more awkward to handle, but it does protect the bowl from all of the detritus and moisture created by the sanding process. I am not removing enough material from the stem for fitment & alignment to become an issue.
The 1000 sanding did a great job on the problems this stem had. There were a couple of tiny bite marks that I could have remedied with further sanding, but I am willing to live with them in the name of not thinning out that part of the mouthpiece further. They really aren't bad, and I am planning to smoke and enjoy this pipe, so perfection is not my goal.
I take a giant step to 2000 grit paper next. One grit in between would probably be desirable, but I began with what I had on the shelf for paper, and it has served very well. This step smoothes the surface scratches that the 1000 grit left, and removes the last of the discoloration from the oxidization. I usually sand with this grit until I am sure I'm done, then go another 10 minutes for good measure.


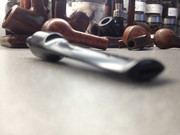
Smoooooooth!
As I work on this pipe, I'm puffing away on a bowl of GH Bright Cream Flake, rubbed out and with a pinch of Altadis Peach Cobbler added. Pipe is a Grabow Grand Duke that I picked up NOS. I like the drug store pipes or cobs while I'm working on projects like this because they smoke well, don't require much attention, and I don't have to worry about clenching abnormally and putting bite marks in them while I am paying attention to what I'm working on. The playlist in the background is pulling from too many different styles to count, and the jumps from CCR to Daft Punk to Lily Allen to Metallica are a great for keeping the atmosphere from getting stale, and preventing the repetitiveness of the sanding from seeming dull or dreary.
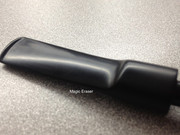
The next step is one that I have added only on my most recent projects. It's here to stay. When I compare the stems I cleaned with this step next to ones where I left it out, or even next to brand new, never smoked pipes, I am simply astounded.
Magic Eraser
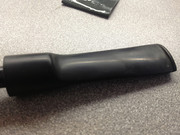
I have read about people using only this tool to remediate oxidization, and tried it myself. My conclusion is that on its own I am not satisfied with the results, but as a final stage in the sanding process it is the fire on the Flaming Moe. The mild abraisiveness of the Magic Eraser creates a glass-smooth surface that polishes up exponentially nicer than the 2000 grit. I spend about 10 minutes with this step, under running water in the sink to keep everything lubricated and clean.
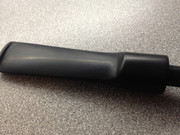
See for yourself:
Yeah, pretty good. I can even see why some people spend a bit more time with this and call it a day after that!
...but not me.
I like to run a cleaner through the stem at this point to thoroughly refresh the stem. Most smokers will exclusively use clear alcohols so as not to impart any foreign flavoring to the pipe. Not me. Not exclusively anyhow. I let the pipe tell me what it wants. Having a faint whiskey or rum in the background for the first couple of smokes is, to me at least, a hallmark of an estate pipe that now has me written into its history in some small way. This disappears quickly and the pipe begins the next phase of it's existence, having known the joy of a stem-ena with quality hooch. Lucky pipe!
It's time for polish.
I'm about halfway through my first tube of Brebbia stem polish. I like it. I'm also pleased with the results I've achieved using Mother's Aluminum and Mag Polish. (again, using whatever I found on my shelf that looked good) My first couple of jobs using the Brebbia polish were ok, but I think I am getting a better feel for it, and it is yeilding some great results now.
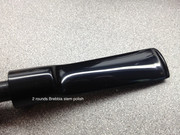


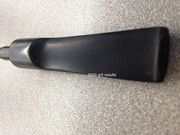
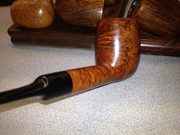
Oooooooh. Ahhhhhh.
I'm pretty happy with this one. Yes, I lost almost all of the coloration on the logo, but this one really didn't stand a chance from the start. It is still there in slight relief, so I may make an attempt to rub in some gold nail polish or paint. For now though, I am pleased with the outcome, and am not about to lose sleep over this minor detail.
The bowl really didn't need much more work after the reaming. A little bit of cleaning on the outside, some elbow grease and saliva took care of the minor rim scorching, and a quick wax job (this is one stage I wouldn't mind having a buffer for) and it is back to it's former glory of half a century ago!


I can't tell yet what style this pipe wants to be dedicated to. I have a feeling it will either be English blends or aromatics. Seems like the latter is the stronger candidate in this case. Time will tell.
On deck is my first P-lip pipe. A Shannon Airport bulldog. Should be a good one!
I've only had my hands on a couple of the poop-ton of different methodologies that others describe, and have managed to find success early on in my experimentation. There are pros and cons to my process, and I love the fact that no matter how excellent one gets at this, there is ALWAYS room to improve, and no two jobs will ever be identical! This is a great, rewarding hobby, and to me, performing all of the steps by hand, and without machinery is all part of the enjoyment. Takes longer, but I'm not exactly paying myself an hourly rate here. I work with devices all day, every day, and I like them very much, but I also appreciate manual process and the feeling of solid tools and aged briar in my hands.
Enough of that, on to the pipe:
I am attracted to a history more than I am to expensive, higher class pipes. (not that I don't also desire those rare and expensive beauties we all drool at when we see them in magazines and photos). This Savinelli Oscar fit nicely into my tastes. Not priceless, not rare, inexpensive, and had a story - the seller was liquidating some collectables from her father and her husband that were ready for new homes. Among that collection was this pipe. Now, accurately dating a Sav isn't really possible, but this one can be placed into a date range that includes part of the 1950s, into the early 1960s as the owner only smoked during that time, but kept his pipes on display between then and now.
Here is what it looked like when I received it:
(click on thumbnails for larger versions)
...not that bad.
Typical cake in the bowl, slight charring on the rim, stem oxidized pretty badly.
But not that bad.
I went to work first on reaming the bowl. My preference is to remove the majority of the cake, until the first signs of briar reveal themselves, and begin with a smooth, even surface to smoke from. I don't use a retort, nor do I salt/alcohol treat the bowls. My feeling is that this piece has a history and a past that it is not my right to erase. I prefer to respect that history by leaving any ghosts that live there to leave in their own good time rather than forcefully evicting them without a moments notice. A few smokes and they will ease themselves peacefully into a new existence, and if they stubbornly refuse to leave, then hey, that's all a part of the historical record. I'll find something to smoke in it that suits the ghosts well.
Minor cake buildup, not a problem.
Easily taken care of with a combination of Senior reamer, buttner reamer, and pipe knife. I like to combine the tools to leverage their various strengths rather than trying to rely o one or the other to do a quality job.
While I worked on the reaming, the stem went into the sonic cleaner. The cleaner does a marvellous job on the oxidization and sterilizes the stem all in one step. Like many electronic appliances, they are cheaply available from Asia. I was able to get mine into the house using what I call the "Fred-Flintstone-Bowling-Ball" methodology; let's just say that the Mrs is also very happy with her new jewelry cleaning machine.
The stem showed typical oxidization, as well as some heavy staining and bite marks. I'm optimistic:
You can see the effect of the sonic cleaning in the photos. Most of the staining was removed, and the ugly green/brown crap is in the same state it would be using a bleach soak, but without the bleach. The logo on the stem looked pretty fragile to me on this pipe, and I didn't like my odds of being able to salvage it, but I was a bit surprised when it all but disappeared in the cleaner. I've done a bunch of stems this way, and never had one fade like that.
Now, there are as many methods of oxidation removal as there are tobacco blends in the world. My preference is light sanding with very fine wet paper, and a lot of patience. I won't rush this process, and I won't use any kind of machine since that increases the risk of permanent damage many fold. As soon as you take away the tactile input, you lose way too much control, and that control is incredibly important in a "destructive" method like this. The drawback of the sanding method is that you are removing material. There is a risk of removing too much, rounding hard edges, creating uneven surfaces, or trashing your logos. I find that an acceptable risk, but I would definitely advise a beginner to practice on a throw away first to get a feel for pressure, direction, time, etc. It is not a difficult process, but it is one that requires an understanding of what is happening, and patience. Many restorers talk of how they are able to complete a stem in 15-20 mins. I usually take 90 minutes or more, but hey, we are talking pipes here. I'm sure you could smoke a bowl of University Flake in 15 mins too, but would you want to?
There is a story of an old carpenter who is teaching a new carpenter the trade, and in showing him how to use the saw, the old carpenter remarks that it is wise to be conservative with cuts. "You can always cut more off, but you can never cut moron" he tells the young man straight faced. I've always liked this bit, and it definitely applies to this method of stem cleaning. I like to start with very fine paper, and work to even finer. Yes, it does make more work and take longer, but again, I'm not paying my bills with this. Since finer abrasives remove material less quickly, there is a reduced risk of irreversible damage occurring, and if it does, it will be far less serious.
Initial sanding is with 1000 grit wet dry paper, being mindful to rinse the stem and paper often to keep the paper clear. The lip of the mouthpiece is usually the trickiest part. To avoid cross hatching scratches that could result from sanding parallel to the crease, I like to fold the paper and sand along the lip using a circular motion that runs mostly perpendicular to the mouthpiece (along the length of the stem). This step is finished when the stem is rinsed and dried, and only the smallest bit of brown is still visible.
Like this:
I prefer to work on the stem separated from the bowl. It makes the stem a bit more awkward to handle, but it does protect the bowl from all of the detritus and moisture created by the sanding process. I am not removing enough material from the stem for fitment & alignment to become an issue.
The 1000 sanding did a great job on the problems this stem had. There were a couple of tiny bite marks that I could have remedied with further sanding, but I am willing to live with them in the name of not thinning out that part of the mouthpiece further. They really aren't bad, and I am planning to smoke and enjoy this pipe, so perfection is not my goal.
I take a giant step to 2000 grit paper next. One grit in between would probably be desirable, but I began with what I had on the shelf for paper, and it has served very well. This step smoothes the surface scratches that the 1000 grit left, and removes the last of the discoloration from the oxidization. I usually sand with this grit until I am sure I'm done, then go another 10 minutes for good measure.
Smoooooooth!
As I work on this pipe, I'm puffing away on a bowl of GH Bright Cream Flake, rubbed out and with a pinch of Altadis Peach Cobbler added. Pipe is a Grabow Grand Duke that I picked up NOS. I like the drug store pipes or cobs while I'm working on projects like this because they smoke well, don't require much attention, and I don't have to worry about clenching abnormally and putting bite marks in them while I am paying attention to what I'm working on. The playlist in the background is pulling from too many different styles to count, and the jumps from CCR to Daft Punk to Lily Allen to Metallica are a great for keeping the atmosphere from getting stale, and preventing the repetitiveness of the sanding from seeming dull or dreary.
The next step is one that I have added only on my most recent projects. It's here to stay. When I compare the stems I cleaned with this step next to ones where I left it out, or even next to brand new, never smoked pipes, I am simply astounded.
Magic Eraser
I have read about people using only this tool to remediate oxidization, and tried it myself. My conclusion is that on its own I am not satisfied with the results, but as a final stage in the sanding process it is the fire on the Flaming Moe. The mild abraisiveness of the Magic Eraser creates a glass-smooth surface that polishes up exponentially nicer than the 2000 grit. I spend about 10 minutes with this step, under running water in the sink to keep everything lubricated and clean.
See for yourself:
Yeah, pretty good. I can even see why some people spend a bit more time with this and call it a day after that!
...but not me.
I like to run a cleaner through the stem at this point to thoroughly refresh the stem. Most smokers will exclusively use clear alcohols so as not to impart any foreign flavoring to the pipe. Not me. Not exclusively anyhow. I let the pipe tell me what it wants. Having a faint whiskey or rum in the background for the first couple of smokes is, to me at least, a hallmark of an estate pipe that now has me written into its history in some small way. This disappears quickly and the pipe begins the next phase of it's existence, having known the joy of a stem-ena with quality hooch. Lucky pipe!
It's time for polish.
I'm about halfway through my first tube of Brebbia stem polish. I like it. I'm also pleased with the results I've achieved using Mother's Aluminum and Mag Polish. (again, using whatever I found on my shelf that looked good) My first couple of jobs using the Brebbia polish were ok, but I think I am getting a better feel for it, and it is yeilding some great results now.
Oooooooh. Ahhhhhh.
I'm pretty happy with this one. Yes, I lost almost all of the coloration on the logo, but this one really didn't stand a chance from the start. It is still there in slight relief, so I may make an attempt to rub in some gold nail polish or paint. For now though, I am pleased with the outcome, and am not about to lose sleep over this minor detail.
The bowl really didn't need much more work after the reaming. A little bit of cleaning on the outside, some elbow grease and saliva took care of the minor rim scorching, and a quick wax job (this is one stage I wouldn't mind having a buffer for) and it is back to it's former glory of half a century ago!
I can't tell yet what style this pipe wants to be dedicated to. I have a feeling it will either be English blends or aromatics. Seems like the latter is the stronger candidate in this case. Time will tell.
On deck is my first P-lip pipe. A Shannon Airport bulldog. Should be a good one!
 :
: