restoring old meer destined to be a smoker

Log in

SmokingPipes.com Updates

Watch for Updates Twice a Week

PipesMagazine Approved Sponsor

PipesMagazine Approved Sponsor

PipesMagazine Approved Sponsor

PipesMagazine Approved Sponsor

PipesMagazine Approved Sponsor

Status
Not open for further replies.

rick777

Lurker
Jun 16, 2011
43
0
I have this old meer I picked up in a junk box a long time ago.

I intend to make it a smoker.
The problem is the dirt all throughout the carving. (mostly grey, definitely not coloring.)

The coloring I am going to leave alone.

I intend to gently scrub the pipe with a very soft toothbrush in water/toothpaste, but I have seen some negative comments about this.

Is there a better/safer way to clean it?
I will re-seal it with beeswax/olive oil.
I have never seen a meer with a screw in tenon like this. Out of curiosity, does anyone have any idea what this pipe is?
FYI; It is missing the stem. I tried some Kawoodie and Dr G stems but they do not fit.

I did find a piece of broken tenon that fits, I will set it into a vulcanite stem and make a new one. (from another junk box)
(Hopefully the picture shows up below...)

old-meer-a-600x450.jpg


pstlpkr

Lifer
Dec 14, 2009
9,694
31
Birmingham, AL
I think Fred would recommend cleaning it with grain alcohol. I'd be careful with the brush, you don't want to score the surface.

Shoot Fred a PM.

I'm sure he'd gladly give you some pointers, and recommend how-to, and where-to acquire a proper stem for it.
It's beautiful by the way.
It's not unusual for the stem to color up like that, well ahead of the rest of the bowl.


baronsamedi

Lifer
May 4, 2011
5,688
6
Dallas
I just fixed up a Meer I bought on fleabay with similar issues. I had a lot of grey dirt that I assume was from being handled with dirty/ashy hands. I cleaned it off carefully with some lemon juice, cotton balls and Q-Tips. I just worked at it until all the grey was gone.
Your design is more intricate so maybe a soft brush will be OK w. the lemon juice. Exellent design!
I thought at first mine had a weird screw-in stem, but it turned out the previous owner had glued the mortise to the tenon and was screwing the mortise in every time. :? I bought a new mortise and stretched the old tenon to fit once I had removed the old mortise from it.
If you don't have a stem for it, I would suggest having one made or sending your pipe to Uncle Arthur. He will probably get you squared away for a reasonable price. The design looks like it would make a really rad churchwarden just from eyeballing the picture.
Once it's clean and you have your stem just go with your original plan to wax it up and you're gold! Another Meer saved from the scrap heap!


rick777

Lurker
Jun 16, 2011
43
0
hmmm, I was trying to figure out the stem style that would have been used. Makes sense to be a churchwarden.

It is definitely a threaded aluminum mortise, just like an old grabow or kaywoodie.

The stem/tenon is simply missing.
Lemon juice, good idea.
In the last couple hours since my first post I have created a stem (at least temporarily). It is not polished or bent yet, but it fits perfectly. A Gloredo pipe cleaner passes easily through it end to end, even the stinger. I used an industrial acrylic epoxy to set the tenon into the stem. (waiting for it to set took the most time) The briar part is just for looks.
stem-for-meer-600x450.jpg


fred

Lifer
Mar 21, 2010
1,509
4
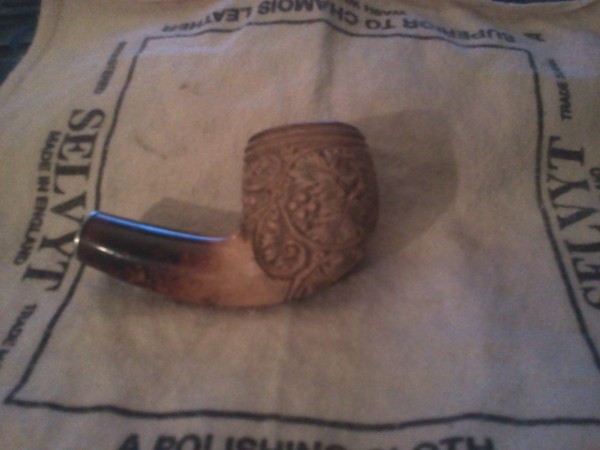
There were a lot of these Turkish Meerschaums with the Kaywoodie style connectors sold to the Armed Forces during the '40's & '50's that were in country during this period. There are some that are still around today and are good Pipes for repair that should smoke well.

Steve Laug has reported good success with Murphy's Oil Soap, in both SF and Foundations, but he was not working with high grade Turkish Block. For the soft Turkish Meerschaum, the use of a soft tooth brush would most likely leave abrasion marks. I cannot provide information on this method with the Murphy's, because I've no experience with it... Using 600 grit wet/dry sandpaper, in a shallow dish of Everclear, works well on smooth surfaces. For rusticated and carved surfaces, the use of a soft white cotton cloth, as a substitute for the sandpaper, works but will require multiple attempts, allowing the Meerschaum to dry between these attempts, so that you can see what progress has been made. For intricate, undercut surfaces, the cloth can snag, so a doubled over Pipe cleaner will offer more control. The problem with this technique is that the patina will be lost, which is something that can take years to return. This method is something that I've come to learn to use in severe surface damage, as a last resort, because of the patina loss.
What I've learned is that Beeswax can effectively, but slowly (as there are no quick fixes) address many surface problems. When I started working on an estate Pipe (Battal's Dunhill Man) the first thing I addressed was removing the cake and cleaning the shank & bit with Everclear. This is also a multi stage process, as the Pipe must be smoked and then cleaned again, until it flushes the trash out of the Block. At the same time, before

I smoked it for the first time, I daubed liquid Beeswax all over the Pipe's exterior and then what was not absorbed, I melted off with a hair dryer, making sure that the Pipe was bone dry and with the bit removed. Years of grime, dust and part of the patina came off with the excess wax. It became obvious that a some point in time, the previous owner had put the Pipe in a smoke jar, because part of the coloring came off with the hot wax. This is not a problem, but instead part of the grime that needs to come off of the Pipe, so that the real coloring (the type that can only come from smoking the Pipe, with available wax to help) can occur. As I smoked the Pipe, I rubbed Beeswax on it, using the heat of the Pipe to melt the wax, which mostly was absorbed by the Block. After a dozen cleaning cycles and using this cold wax application to the Pipe, as it was being smoked, the Pipe was flushed and the surface was showing true coloration and patina. This method of Beeswax application will also work with rim char, by diffusing and spreading the carbon. It does not work with rim scorch, a condition that requires use of the Everclear and sandpaper. If you want, a light cleaning with a dampened white cotton cloth, using Everclear to dampen the cloth, can be used before the hot wax application. The thing to pay attention to in doing this is to keep in mind that this is only a light cleaning, that you might do to address gross debris buildup, so that you do not disturb the patina. Over time, I've learned that cleaning up estate Meerschaums can be a lesson in delayed gratification. I used to rush into removing surface blemishes with Everclear and wet/dry sandpaper, which works well and requires rewaxing. The drawbacks to this are the adverse results it can have on the Patina, which is the most time consuming aspect of bringing these Pipes back to their path of evolution. At present, I'm dealing with this same problem of 'ashtray marks' on a 24 year old Bekler. My approach to this is less aggressive than my past actions, as I'm doing the best I can not to disturb the Patina, which is starting to show more than it did when I first started working on the Pipe. Initially, I worked on these blemishes with a white cotton rag with Everclear on it, just enough to remove the surface grime, but not enough to draw the entire spot out of the Block. Before smoking it for the first time, I cold waxed the entire Pipe, paying particular attention to these blemishes, As I smoke the Pipe, I rub Beeswax on it, with attention to these spots. After a half dozen smokes, the Pipe is starting to show more of it's coloration and these blemishes are becoming diffuse, so that they are less defined. This technique seems to be better in the long run, as the Patina continues to develop more than if I'd used sandpaper. This method of waxing also works well with keeping the bowl plateau of a new Pipe from getting scorched, as the Beeswax works to spread the smoke marks as well as aid coloration and provide protection for the Block.


rick777

Lurker
Jun 16, 2011
43
0
Fred, I honestly think you should write a book. (or have you?)

I can tell you know more about the subject than the rest of us could ever hope to learn.
I am going to scrap the brush. Take a first go at it with some everclear and Qtip/cotton ball. Get rid of the grey clumps. Let it dry, and slather liquid beeswax on it and melt it off with a heat gun on low. (closest thing I have to hair dryer.) Basically as you describe above.
Q: I am kicking myself. I walked right past a honey farmer at a large regional market last weekend. He had a block of pure beeswax for sale the size of my head. $20. (rather large block...) I won't be back there until fall. I am seeking a local supplier right now.

Will a blend of mineral oil/beeswax work similarly? (pure, only the oil and wax, mostly wax.)
Q: Baronsamedi seemed to think this may have been a churchwarden. The shape looks right.

Either way, any ideas where I may stand a chance of getting the right stem for it?

I will be quite happy smoking it with the one I am making, but it would be nice to have the "original".

Parts would be ok too, I have a handful of churchwarden stems etc coming from PIMO right now.
Thanks for your help!


fred

Lifer
Mar 21, 2010
1,509
4
Thanks guys, but I'm still learning about these Pipes myself... The Beeswax I prefer to use is white, although different grades of unrefined Beeswax are in use by Carvers. I've read accounts of using various oils and potions mixed in with the wax, some dating from over 100 years ago, while others are more recent. I have no experience with additives in use now or back then, so I keep it simple with Beeswax. Meerschaum Carvers have their own signature finishes, but the likelihood of anyone finding out much about "Turkish Beeswax" is remote, as these guys don't share this information. Yes, you can use a heat gun but make sure that there is absolutely no moisture in the Block, or you run the risk of cracking it, and it's best to remove all of the hardware as the different expansion ratios can also result in a cracked Block and will most certainly melt a bit. It is a slower process to melt the wax using the heat of the Pipe as it is smoked, but it will get good results and doesn't make the mess that using other techniques of application produce. A cautious approach is best until you get the experience of how Block absorbs Beeswax that comes with time and patience. Here's more information....

http://pipesmagazine.com/blog/put-that-in-your-pipe/slave-to-the-white-goddess/


fred

Lifer
Mar 21, 2010
1,509
4
Thanks again... Including the article that I just linked to in the last post, there are 2 more that I wrote for Kevin. If he asks for more articles, I can certainly oblige. There is just a lot of things to learn about these Pipes and their culture, which is something that I enjoy. If it's not fun, then why bother...?
http://pipesmagazine.com/blog/put-that-in-your-pipe/the-meerschaum-pipe-experience/
http://pipesmagazine.com/blog/put-that-in-your-pipe/the-thrill-of-the-hunt-a-guide-to-estate-meerschaums/


rick777

Lurker
Jun 16, 2011
43
0
great articles. Meer pipes are fascinating.
My GF was in turkey a few weeks ago, I armed her with a bunch of printed info and she bought a block meer calabash (real gourd) direct from the artisan. It is quite nice. I know gourd is supposed to be impossible to get new, but there is a limited supply which some artisans in turkey are using.
Here is a pic of my project pipe with my "temporary" stem. Next to it is a pipe gifted to me 23 years ago, it is actually a unicorn but the horn was broken off when it was given me. I have been casually looking for someone local to re-carve the broken horn into part of the mane, but so far nobody wants to touch it.
http://pipesmagazine.com/wp-content/blogs.dir/1/files/album/2858/meers-600x450.jpg

 
Status
Not open for further replies.