Photographing Pipes

Log in

SmokingPipes.com Updates

Watch for Updates Twice a Week

PipesMagazine Approved Sponsor

PipesMagazine Approved Sponsor

PipesMagazine Approved Sponsor

PipesMagazine Approved Sponsor

PipesMagazine Approved Sponsor

Status
Not open for further replies.

zack24

Lifer
May 11, 2013
1,726
2
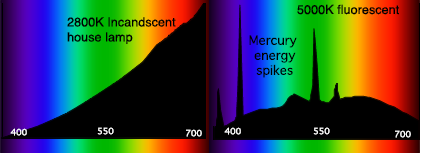
One thing that makes me crazy is taking consistent, quality pictures of pipes...Tried out a new rig today with an old Canon EOS 20D hooked up to my iMac with Digital Photo Professional- it gives me full control of all the camera settings and even triggering the shot from the computer...Still have some work on calibrating the white balance...but it's a start...

2a9y0lc.jpg


guhrillastile

Starting to Get Obsessed
Mar 29, 2013
208
0
I left, then had to cone back to this thread. Many of us sift and read and refrain from commenting in threads because we don't have anything really constructive to contribute.
But instead of just reading and moving on as usual it got me thinking. To come back and take pause. To say thanks for sharing it. And your process. And for the effort that does help others. Invisible to you that it helped me if I didn't post.
Thank you. Got a gear turning in my head for something. Also as a side note I missed you in Vegas but look forward to chatting with you about a couple things I won't litter your thread with here.
Keep us posted on the developments. Great thread.


wayneteipen

Can't Leave
May 7, 2012
473
222
I have the same light box kit as you have. I'll have to check out the software. I'd love to be able to hook up directly to my laptop. Another option for amazing definition is to use a micro lens and stack focusing.


wayneteipen

Can't Leave
May 7, 2012
473
222
I picked one up just like it off of ebay a few years back. It's not the best but it gets the job done well enough. I think I paid $25 bucks for it.


zack24

Lifer
May 11, 2013
1,726
2
I missed the replies today- been shooting since early- finished maybe 80 shots for my website.
Answers for a couple of questions- Peck- It's the ProMaster Tabletop Studio- comes with lights and everythign in a carrying case- about $99. Cowboy Studio also has similar kits at a little better price...
Wayne, the software was bundled with the Canon Eos20d I bought a few years ago...but if you're shooting a newer DSLR, there's a software program DSLR REmote Pro that will even allow you to focus off the computer- works with most popular cameras- $175 bucks . Even the software I was using today was unbelievable! The cool thing is I would shoot 2 pipes- 6 pics each- crop them in about 5 seconds each, apply a universal filter the entire batch at once to sharpen, adjust tone, and color correct. Once that was done, I set the output file parameters and ran them all as a batch. At least 4 or 5 times faster than you could do it in Photoshop. I'm still having issues getting the white balance correct- the colors are good on the pipes, but the background has blue cast...Using a white board to set the White Balance, but it's still not right.
On the subject of lenses- this was crappy 18-55 that came with the camera- I was really surprised at the details...
Here's a few shots...

sg7br9.jpg


30l12f8.jpg


jkhx5c.jpg


97pnw7.jpg


(...and yes- the last stem looks pretty sad- one of my ones from earlier this summer...:)


zack24

Lifer
May 11, 2013
1,726
2
Keith,

Those are some of the pipes that I make...Kind of a long story, but I made a couple of hundred pipes back in the 80's when I was a woodcarver at Opryland, took about 30 years off and started making pipes again in June... Made about 30 pipes since then, had a table at the Vegas show and discovered just how far I had to go.(Actually beginning to like stemwork- never had cut one before June- that's been a huge challenge- 30 years ago, it was all preform stems with a few mods...)The challenge with pipemaking isn't carving pipes- you also have to be a website programmer, photographer, accountant, designer, machinist, and a woodworker...


woodsroad

Lifer
Oct 10, 2013
13,137
22,795
SE PA USA
If I may...
A couple of things are tripping you up.
97pnw7-vi.jpg

1. For starters, you have two different light sources. One is colder/greener than the other. So if you set white in the middle of the frame, the edges go cold, most notable on the right side. Be careful about mixing light sources when you are shooting with a white background. And never use fluorescents as a light source, they are very spikey in their spectral output, so they are damned near impossible to correct for.
Spectral_Power_Distributions.png

2. The photo is underexposed by about a half stop. But, looking at the histogram, I'm guessing that the original was possibly overexposed? There isn't a black point, but there isn't a white point, either, but all the image info is pushed up against the top end.
But... I fixed that for you
97pnw7_edit-vi.jpg

Now go read the camera manual about setting a custom white point. It will be a lot easier once you eliminate whatever is polluting the image with blue/green.


zack24

Lifer
May 11, 2013
1,726
2
Woodsroad, Where were you earlier today! Here's where it gets confusing- I'm using the two halogen lights that were supplied with the tent. I'm working in near darkness except for those two lights, so no pollution from outside or room lights. I'm shooting a pic of a white piece of paper and setting a custom white balance based on that. I'm attaching a pic with the settings I used- hopefully they're visible...Where am I out of whack?

2gt2l36.jpg


zack24

Lifer
May 11, 2013
1,726
2
Just a white piece of paper...and I just remembered...I think I have a filter I put on that on that lens years ago during a trip to Hawaii...that would probably be enough to screw things up...Headed out the door for the night- I'll pull that filter and try again tomorrow...(It's always human error....)


woodsroad

Lifer
Oct 10, 2013
13,137
22,795
SE PA USA
No, a filter will not change a custom white balance. The white balance will compensate for it, just as it does for a light source.
Here's what you need to do: Frame your picture, then remove the pipe. The frame should then be filled with just the white tent. Shoot your test frame without exposure compensation. The frame should expose to 18% gray. Use that frame to set the custom white balance.
Taking another look at your setup, I see why there are two different colors of light: The pipe is reflecting off the background. It's the problem with these small tents. the background is much too close to the object being photographed. So the pipe is reflecting yellow-orange light on to the background.
An easy solution is to take it in to photoshop and do a knockout (that's what I did, amongst several other things, in the corrected photo that I posted).


rebornbriar

Starting to Get Obsessed
Aug 21, 2013
250
2
United Kingdom
White balance seems to be the most difficult thing for me to correct also. Photoshop scares the hell out of me and I am using antiquated PaintShop Pro.
Woodsroad,the edit you made to Zak's picture makes all the difference. How long did this take you to do? Could you point us in the direction of a YouTube tutorial which explains this? When you don't know how to use a program or the technical terms, you don't know what to search for!
I do tend to shoot with the pipe at the front of the light box to maximize the distance to the background.


woodsroad

Lifer
Oct 10, 2013
13,137
22,795
SE PA USA
Alan, this is what I do for a living. Don't ask me to restore a pipe, it will take me weeks. Ask me to clean up a photo and it's done in 10 minutes. And I'm not even that good at it! There are a lot of steps involved, but it's kind of my default workflow, and it all zips by pretty quickly. A lot of it is just looking at the photo and knowing what is wrong. That's experience. As you well know, tools do not make the craftsman. They help a talented person do the job, but that's about it. So, I could start to tell you what I did, but none of it would make much sense to you.
However, here's a link that might help you out:
http://www.apassionforpipes.com/neills-blog/2012/6/26/on-pipe-photography-image-processing-with-a-tutorial.html


rebornbriar

Starting to Get Obsessed
Aug 21, 2013
250
2
United Kingdom
Thank you. I think I read this some time ago, but being photoshop it whooshed straight over my head! :) Now I need to take the time to learn this program which I think will make things slightly easier. My initial shots do not have the blue hue in the background of Zak's, more a light gray - so I am probably getting my camera settings nearly right.
I need to get to under 10 minutes per shot. 6 shots per pipe would be 1 hour, and 20 pipes in a week represents a lot of processing time :) This is before I write up the descriptions and measurements etc, taking even more time. This impacts greatly on the number of pipes I can make available each week. Perhaps I need to look at outsourcing this?
I have also found out this week how to do at least a simple monitor calibration, which has shown up shadowy areas in my post processed images I never noticed before :)


zack24

Lifer
May 11, 2013
1,726
2
Still working on it...finally got rid of the blue. The key is to get rid of all the adjustments except the white balance. Get that right and then tweak from there. Rebornbriar- get the software- automate the repetitive steps- I'm a lousy photographer, but used to be a scanner operator for a busy prepress company, so I'm very familiar with calibration...it's just been a while...:)

 
Status
Not open for further replies.