


I was fortunate to find 4 blocks of Meerschaum at a reasonable price. I've never worked with Meerschaum before but this was a lot of fun and I learned a lot of facts and lessons about working with Meerschaum along the way. First, a little bit of history about these particular blocks that I was fortunate to find at Chris Morgan Pipes.
Thank you Chris!
These blocks were found in the basement at Uhles pipe shop in Wisconsin. With their cooperation we are bringing you a very rare chance to own some real Turkish block meerschaum. Due to Turkish law, meerschaum is illegal to export from Turkey. These were brought into the country before the law went into effect. They have been dated by the owner to be 50-60 years old. They are all roughly the same size at 3" long by 1.6"wide by 2" tall.
These blocks are workable and have been stored properly. They are being sold AS IS. Please be advised meerschaum is a tricky material to work with. Once they are sold out you'll likely never see meerschaum like this again.
Here is how I turned and shaped the Meerschaum block. Some folks advised turning my lathe by hand.
I turned the entire block on my wood lathe at a speed of 450rpm. That's the lowest my lathe turns. The block turned flawlessly and with no issues. No chips or gouges. You can also use a Dremel tool and various bits with no problems at all.
This was one of the most rewarding and fun projects I've worked on to date. The meerschaum is very easy to work on but caution and attention to what you are doing at all times. A lesson I learned the hard way.
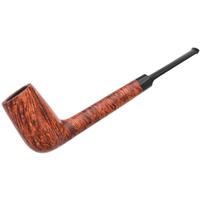
If you notice, the shank is not flat. That is because for a nano-second blink and inattentiveness, I went a little too deep at the bowl end of the shank and my tiny Dremel bit, bit too deep before I noticed what I had done. What to do? Since I had already glued the cap in place I decided to continue going. Next time I won't fix the cap until I'm confident that my shaping is complete.
Lesson learned.
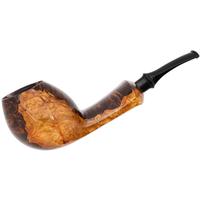
The pipe has several coats of beeswax. In the end I didn't immerse it in a boiling beeswax bath but just used my wax wheel.
The stem is 11.5mm Japanese Ebonite and it fit the cap perfectly and the drilling is dead center flawless.
The spur is correctly positioned as per a standard briar cutty.
Contact me if you might be interested in purchasing.
Anyway, here are a few pics.


Thank you Chris!
These blocks were found in the basement at Uhles pipe shop in Wisconsin. With their cooperation we are bringing you a very rare chance to own some real Turkish block meerschaum. Due to Turkish law, meerschaum is illegal to export from Turkey. These were brought into the country before the law went into effect. They have been dated by the owner to be 50-60 years old. They are all roughly the same size at 3" long by 1.6"wide by 2" tall.
These blocks are workable and have been stored properly. They are being sold AS IS. Please be advised meerschaum is a tricky material to work with. Once they are sold out you'll likely never see meerschaum like this again.
Here is how I turned and shaped the Meerschaum block. Some folks advised turning my lathe by hand.
I turned the entire block on my wood lathe at a speed of 450rpm. That's the lowest my lathe turns. The block turned flawlessly and with no issues. No chips or gouges. You can also use a Dremel tool and various bits with no problems at all.
This was one of the most rewarding and fun projects I've worked on to date. The meerschaum is very easy to work on but caution and attention to what you are doing at all times. A lesson I learned the hard way.
If you notice, the shank is not flat. That is because for a nano-second blink and inattentiveness, I went a little too deep at the bowl end of the shank and my tiny Dremel bit, bit too deep before I noticed what I had done. What to do? Since I had already glued the cap in place I decided to continue going. Next time I won't fix the cap until I'm confident that my shaping is complete.
Lesson learned.
The pipe has several coats of beeswax. In the end I didn't immerse it in a boiling beeswax bath but just used my wax wheel.
The stem is 11.5mm Japanese Ebonite and it fit the cap perfectly and the drilling is dead center flawless.
The spur is correctly positioned as per a standard briar cutty.
Contact me if you might be interested in purchasing.
Anyway, here are a few pics.


