I need help with my first pipe(s) restoration project...

Log in

SmokingPipes.com Updates

Watch for Updates Twice a Week

PipesMagazine Approved Sponsor

PipesMagazine Approved Sponsor

PipesMagazine Approved Sponsor

PipesMagazine Approved Sponsor

PipesMagazine Approved Sponsor

Status
Not open for further replies.

jacoboverton

Lurker
Jul 4, 2014
4
0
I purchased 12 estate pipes from ebay and I need help restoring them. There are major problems with some of them, like: lots of cake on the inside of the bowl, the stem won't stay connected to the bowl, bite marks on the stem, lack luster color, and clogged bowls/stems..... and I really don't know where to begin and what supplies I need. I skimmed a few lengthy articles on the subject , but they seemed rather complicated so I'm hoping you fine people can help make it more simple and clear for me.

I have a few questions:

1.) if the bowl is cracked is there any hope in saving it?

2.) How do I get rid of the cake on the inside?

3.) Is there a way to make the stem stay connected to the bowl (a few don't stay connected)?

4.) What supplies do I need to make this happen?
I'll try to upload pictures as soon as I can.


peteguy

Lifer
Jan 19, 2012
1,531
916
1.) Depends on what you mean by save. Sure you can fix it so that you can smoke it but esthetically it is going to look bad imho.

2.) A pipe reamer.

3.)There are a few ways depending on the severity. You can smoke it and it will expand but barely. You can add some fingernail polish to the tenon. You can also heat the tenon and press on it against a flat surface. They are all kind of iffy for what you describe with it falling out.

4.) none really - you can send them out and have them done for you. If you want to diy there are many methods for restoration and the supplies will go with what method you choose. To address your issues listed above:
cake = reamer, stem wont stay connected = new stem or tenon, bite marks = files, sand paper, micro mesh, or a new stem, lack luster color = buffer, clogged = lots and lots of pipe cleaners, alcohol, wire brush type pipe cleaners, straightened out paper clips, etc.
A photo will really help. Google reborn pipes for a good place to start if you want to diy.


torque

Can't Leave
May 21, 2013
445
2
+1 for Reborn Pipes, wealth of info and ideas on that site.
1. I have a bowl that is cracked all the way through and halfway down. There is no separation along the fault line, it's a great smoker and I use it every day. It's certainly nearing the end of it's serviceable life and I'm going to let the old girl go out doing what she was built to do, being a smoking pipe.
2. If the bowl is extremely caked (60 to 90% blockage) then a reamer has a good chance of not fitting into the bowl. In that case you have to get creative and use something else to break the heavier portion of the cake out until a reamer will fit. The most common way is to use a dull knife to scrape at the cake until a reamer will fit. There are three different styles of purpose built pipe reamers and all will have their place in different situations. Also remember, always try to ream as concentric to the walls of the pipe as possible. Won't make much difference at first but makes a lot of difference the closer to the walls you get. If you ream off center then you can end up at the wall on one side with a still substantial amount of cake on the opposite side. Not the effect you are going for.
PIPNET - This is a set of fixed width reaming heads with a quick change drive handle. You start with the smallest size and work your way up until the pipe is fully reamed. Use caution and stay out of the side wood of the bowl and out of the wood around the rim.
Senior Reamer - Heavy duty adjustable reamer. Start with it adjusted to the smallest size and adjust it up incrementally as you ream. The nose on the senior reamer is very tapered so, to me, this one is much better for conical or "V" shaped bowls. Same caution as above about not getting into the wood.
Brigham or Butner style reamer - Another adjustable reamer but the nose isn't tapered so, again to me, this one is much better for a "U" shaped bowl. Same caution about getting into the wood.
3. Need a better explanation of what you mean by this and pictures would help. If the stem is just loose then peteguy has already run through the best options. Clear fingernail polish is my go-to fix.
4. Start with some reamers to get the cake under control and then you can start to think about stummel and stem restoration. If you get the senior reamer, it has a tool built into the handle that will help you clear the airways, just use carefully as it's basically just a properly sized drill bit.
Definitely google reborn pipes and start reading the posts there. Knowledge is power and reading what those guys are doing will certainly take some of the mystique out of it for you.


newbroom

Lifer
Jul 11, 2014
6,391
10,272
North Central Florida
Since this topic is started here, I want to ask you resto gurus for a tip on holding sand paper to work stems.

I know there are some good ideas out there.

For instance, I cut sand paper into strips and wrap one half of a clothes pin to use the pin as a backer/holder...but I know there's gotta be something better, offering more grip on the paper than an overlap and an index finger.


purplemotoman

Starting to Get Obsessed
Aug 7, 2014
195
0
Mr. Steve Laug (rebornpipes) has been a huge help and inspired me to do cleanups and restos. Here is a good article to get you going. http://rebornpipes.com/2012/05/31/list-of-supplies-for-refurbishing/


tuold

Lifer
Oct 15, 2013
2,133
172
Beaverton,Oregon
@newbroom,
For really rough stem cases I used a sanding sponge. They are especially good at getting to curved surfaces. Then I switch to micro-mesh pads. The files are great, too. I've even used emery boards in some cases.
Here's a link to a previous discussion on the subject: Essential Tools


torque

Can't Leave
May 21, 2013
445
2
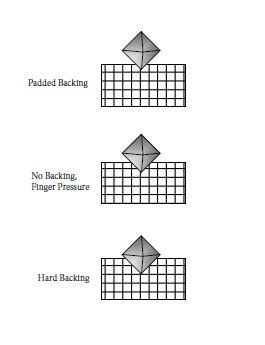
Also, a quick word of caution on using hard backings for abrasives. While I can see the appeal of using a hard backed abrasive when removing tooth chatter or other flaws as is sometimes necessary, I would caution against using a hard backing when moving on to the polishing phase of stem refurbishing. Grit penetration of the work surface can be as much determined by the backing as by the choice of abrasive itself. A lot of flaw removal is about removing stock from the work piece to create a more "blended" look to the surface. Polishing is more about smoothing the surface scratches on the work piece while minimizing the creation of new ones.
A hard backing like wood or a hard rubber block is great for cutting action (gouging the surface) of a work piece but tends to be too aggressive for polishing. When force/pressure is applied to a surface, that surface wants to "resist" the force and return some of it back in the direction of application. A hard backing doesn't allow much "give" and the grit maintains a high level of penetration into the surface. This high level of penetration promotes the cutting of new furrows in the surface, i.e. removes stock, which is counter productive to the goal of surface smoothing.
When an abrasive is used, it cuts a series of "peaks" and "valleys" into the work surface. These peaks and valleys create a very dull looking surface due to the laws of refraction. The goal of polishing is to "wear away" these peaks without deepening the low spots any further. A hard backing keeps the particles pushed into the surface as deep as possible running the risk of cutting the low spots even deeper, rather than simply smoothing out the high spots.
No backing at all is much preferable to a hard backing but still isn't the most ideal. When using finger pressure you can actually feel the surface resisting the applied pressure. This "tactile feedback" will almost invariably cause someone to unconsciously press down on the abrasive even harder, again causing the particles to penetrate further than is necessary for a smoothing effect.
A padded backing is most ideal for polishing a surface. This type of backing will allow some "float back" of the grit which will help keep the particles out of the low spots while still allowing them to wear away at the high spots. This will minimize stock removal and will actually give a higher gloss to the surface in a shorter amount of time due to having to spend less time per grit, making it a much more efficient technique.
Below is a diagram I threw together, certainly not meant to be perfectly accurate or to scale, lol, but it does illustrate the concept of the grit penetration of different backing types.

 
Status
Not open for further replies.