
I was reading this pipe restoration and the author said that he sanded down the whole pipe with micromesh. I am assuming he put paint in the stamps to make them come back black (I've seen it done with white paint for the stem). I have tried it on a couple of pipes with a split trunnion, but the stamp was virtually gone. I was wondering, how do you guys do it? BBK Pipes – rebornpipes - https://rebornpipes.com/tag/bbk-pipes/
Saving the Stamping
- Thread starter msattler
- Start date
You are using an out of date browser. It may not display this or other websites correctly.
You should upgrade or use an alternative browser.
You should upgrade or use an alternative browser.

SmokingPipes.com Updates
Watch for Updates Twice a Week
PipesMagazine Approved Sponsor

PipesMagazine Approved Sponsor

PipesMagazine Approved Sponsor

PipesMagazine Approved Sponsor

PipesMagazine Approved Sponsor

It's best to avoid getting anywhere near the stamping. It's too easy to obliterate info. Hand polish that area (no buffing wheel).

So if you're removing the old stain, do you use a chemical stripper here?It's best to avoid getting anywhere near the stamping. It's too easy to obliterate info. Hand polish that area (no buffing wheel).
Many stains are alcohol soluble. It depends on the pipe. There are members here with far more knowledge and experience who will have useful suggestions. Generally, I limit myself to cleaning up pipes as opposed to refinishing.
I don't have the skill to remove stain and will emasculate anyone who goes near the stamping on the pipe.
I haven't run into this in restoration, but in maintaining my pipes, I only hand buff. Many stamps are very shallow, and I have one Greek Amadeus pipe that has a stamp that isn't even complete, doesn't spell out the brand name completely. I'd guess, in a deep restoration where a lot of crud is being removed, you'd have to tape over the stamping and just leave it in a sort of dark halo to maintain it at all. A stamped pipe is inherently more interesting, and in some cases more valuable. A pipe without a stamp is just a guessing game.
Anytime you remove stain from a pipe or oxidation from a stem you're going to lose material and that sometimes includes stamps and logos. That being said, they are just pipes.
I've never seen stamps with original black paint in the lettering. Sometimes gold or silver though. When you see a heavily buffed old pipe, and the stamping looks darker than the stummel, I believe that might be from something else getting trapped in there (stain or oil) when the pipe was previously cleaned up, but I'm unsure.
I agree that you want to keep away from the stamping when you are sanding or using micromesh, but here's what has worked for me 100% of the time when I had an old overbuffed pipe with weak stamping:
If the pipe's finish is a wreck and I'm going to have to scrub the pipe clean and refinish, I will scrub with straight Murphy's Soap, using a toothbrush, then rub in Danish oil after it's dry. The stamp is often a little clearer when I'm done. The Murphy's Soap brings up the grain a little, but then the Danish Oil presses it back down (when you rub it in). Then you add whatever finish you want;e.g-carnuba wax or B&A balm, and the stamp should look even better. The key is to keep the sandpaper and micromesh away from the stamp. If the stummel is rough around the stamping I sometimes use a very, very fine micromesh and that doesn't seem to affect it, but will smooth down the 'meant to be smooth' wood around the stamping.
warning - Danish Oil will darken the wood, so keep that in mind if you're restoring a lighter-colored pipe, and perhaps find a different oil such as a Tung Oil/alcohol mixture.
I've been staining all of the ones that I have had to completely strip and fill holes/cracks with dark walnut, espresso or cherry mahogany. Luckily these have been low end gabrows or medicos, so pretty low end. I will take extra care in the future. This is because my sanding is taking away more than just the glue. I am still having trouble with the caranuba wax. Every time I touch it, even with gloves on, it leaves finger prints. Maybe it's because my IQ is 4I've never seen stamps with original black paint in the lettering. Sometimes gold or silver though. When you see a heavily buffed old pipe, and the stamping looks darker than the stummel, I believe that might be from something else getting trapped in there (stain or oil) when the pipe was previously cleaned up, but I'm unsure.
I agree that you want to keep away from the stamping when you are sanding or using micromesh, but here's what has worked for me 100% of the time when I had an old overbuffed pipe with weak stamping:
If the pipe's finish is a wreck and I'm going to have to scrub the pipe clean and refinish, I will scrub with straight Murphy's Soap, using a toothbrush, then rub in Danish oil after it's dry. The stamp is often a little clearer when I'm done. The Murphy's Soap brings up the grain a little, but then the Danish Oil presses it back down (when you rub it in). Then you add whatever finish you want;e.g-carnuba wax or B&A balm, and the stamp should look even better. The key is to keep the sandpaper and micromesh away from the stamp. If the stummel is rough around the stamping I sometimes use a very, very fine micromesh and that doesn't seem to affect it, but will smooth down the 'meant to be smooth' wood around the stamping.
warning - Danish Oil will darken the wood, so keep that in mind if you're restoring a lighter-colored pipe, and perhaps find a different oil such as a Tung Oil/alcohol mixture.
This is why I fled North America to the South Pacific.I don't have the skill to remove stain and will emasculate anyone who goes near the stamping on the pipe.
So… why do we want to remove stain? It’s usually put on pipes for good reason. Sometimes stain is used to accentuate good grain, or to hide mediocre grain, or to bury fills behind colour.
I have never fully stripped a stummel, not in 100s of restorations. I have, however, used acetone or isopropyl alcohol dipped cotton balls to remove surface oils and crud, and this always removes a little stain. Using a matching (or close) aniline dye diluted in rubbing alcohol as a tint can help rejuvenate those pipes.
Also, I’m not allergic to buffing the entire stummel with carnauba wax and then a flannel cloth or Dunhill pipe wipe.
This is why I fled North America to the South Pacific.
So… why do we want to remove stain? It’s usually put on pipes for good reason. Sometimes stain is used to accentuate good grain, or to hide mediocre grain, or to bury fills behind colour.
I have never fully stripped a stummel, not in 100s of restorations. I have, however, used acetone or isopropyl alcohol dipped cotton balls to remove surface oils and crud, and this always removes a little stain. Using a matching (or close) aniline dye diluted in rubbing alcohol as a tint can help rejuvenate those pipes.
Also, I’m not allergic to buffing the entire stummel with carnauba wax and then a flannel cloth or Dunhill pipe wipe.
We think alike. The only time I ever scrubbed a stummel with alcohol was to clean a 'virgin' (unstained) pipe.
What I find with dark pipes - reds or browns - is that I only need to scrub with Murphy's Soap to remove all the finish, crud, grime, etc. The stummel will dry and look very light in color, but rubbing in oil brings the stain right back, except in odd cases.
When I decide to remove stain from an old pipe (color is patchy, inconstant, fugly), 95% of time it is rubbing alcohol and a 3M Scotch-Brite scrub pad. I find the 3M Scotch-Brite scrub pads fairly aggressive, but since they are essentially made of plastic, they really can't do much damage to briar. This combination is very effective on even the most stubborn of rim char stains too. However, the serious rim char issues takes some serious effort.
When I decide to remove stain from an old pipe (color is patchy, inconstant, fugly), 95% of time it is rubbing alcohol and a 3M Scotch-Brite scrub pad. I find the 3M Scotch-Brite scrub pads fairly aggressive, but since they are essentially made of plastic, they really can't do much damage to briar. This combination is very effective on even the most stubborn of rim char stains too. However, the serious rim char issues takes some serious effort.
That's interesting - had not thought of using a Scotch-Brite. We used to use those to scrub down the grill at the end of the night when I worked in a restaurant kitchen, so I know what they are capable of.
You might want to try a Magic Eraser with alcohol.
The reason why I removed the stain is because while sanding down the glue/epoxy for a cracked stummel I have yet to not sand the briar as well. That removes the stain. I'm pretty new to pipe restoration. I have restored quite a few pieces of antique furniture, and I will usually stain them to match the wood work in our house from 1907. Old habits I guess.This is why I fled North America to the South Pacific.
So… why do we want to remove stain? It’s usually put on pipes for good reason. Sometimes stain is used to accentuate good grain, or to hide mediocre grain, or to bury fills behind colour.
I have never fully stripped a stummel, not in 100s of restorations. I have, however, used acetone or isopropyl alcohol dipped cotton balls to remove surface oils and crud, and this always removes a little stain. Using a matching (or close) aniline dye diluted in rubbing alcohol as a tint can help rejuvenate those pipes.
Also, I’m not allergic to buffing the entire stummel with carnauba wax and then a flannel cloth or Dunhill pipe wipe.
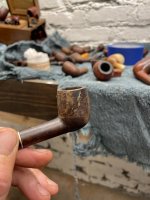
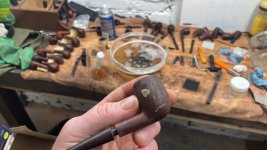
Here’s an example. It is an old Lark that I had split the bowl when using a reamer. From then I had epoxied the bowl and just used it for my outside pipe. It had paint splatter on the bowl from painting the gun room, motor oil from working on motorcycles and cars, etc. I went with a dark walnut stain. Due to how much sanding took place, I had to restain the pipe
Attachments
-
 03B775B9-BF24-4437-B35F-9F1240FF6B85.jpeg108.3 KB · Views: 11
 -
 189F1A4A-EDC9-42A6-8E36-EDCF360829FB.jpeg108.2 KB · Views: 10
 -
 22A1BFD5-77FE-4A68-89ED-0C5662F9193F.jpeg92.3 KB · Views: 9
 -
 83D8229D-7B82-42EB-8D96-DF308A1FC7E7.jpeg92.4 KB · Views: 9
 -
 AA53A328-C44F-4274-8FD1-A938FD68FA95.jpeg85.2 KB · Views: 9
 -
 F346DBB6-94D8-45CA-80E9-C67D2FA6AA25.jpeg92.6 KB · Views: 11
 -
 08AB06CE-11A2-4014-BA5D-D63622A8C0F5.jpeg96.9 KB · Views: 10
 -
 53D25226-B976-4603-BD8E-5A98536B4775.jpeg127.4 KB · Views: 10
 -
 EE5BB1CB-DF99-470D-92EC-B5627F96BBB6.jpeg147.1 KB · Views: 11
Last edited:
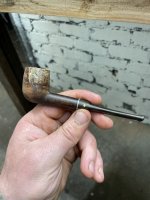
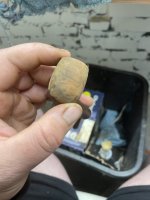
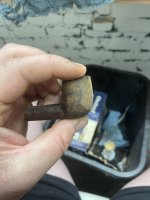
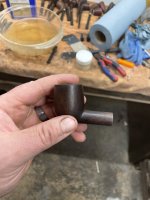
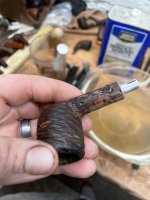
This one is a Wally’s. It was in a bag of estate pipes that was dropped off that sat in a musty basement since probably the 80s. I couldn’t get it apart to begin with. It had what appeared to be dog marks across it, that were filled with a pink/red filler. I’m not sure what you guys would’ve used here, but I refilled the marks with stainable wood filler and stained it mahogany. As you can tell, the wood filler did not take the stain.
Attachments
-
 1BC1F3E7-ADFF-4658-B764-7B40B277BFFC.jpeg247.2 KB · Views: 5
 -
 8ACE5F8B-4A80-4BA4-B7C8-6B1CA83806B6.jpeg225.3 KB · Views: 5
 -
 2373B655-A5F8-4856-8E8A-3588D791430E.jpeg225.6 KB · Views: 5
 -
 B6CD8640-BF32-4505-A6F4-E8E0B8C95B54.jpeg232.6 KB · Views: 5
 -
 F231D3C5-E21B-40B2-AD0C-6D70513A3892.jpeg231.2 KB · Views: 5
 -
 F9010F9A-E251-498E-97D9-9DBD6D72CCB7.jpeg229.9 KB · Views: 5
Last edited:
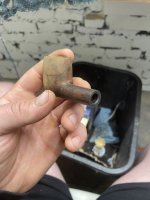
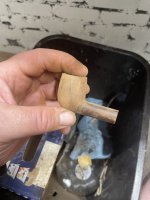
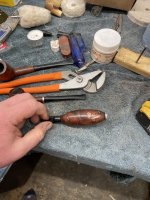
This one had a split stemmel, so I stuck a Vaseline coated pipe cleaner in there and epoxied it and clamped it shut. I ended up ruining the stain sanding down the epoxy, so I went with the dark walnut again. It was lighter than this to begin with. I have put several coats of wax on it, but it still appears dull after a while.
Attachments
-
 91418DA8-B06B-45D9-9D98-EDBFD9B2366B.jpeg190.5 KB · Views: 6
 -
 3F417702-0588-463B-90D3-92B79A63E6AD.jpeg99.3 KB · Views: 4
 -
 BFCFBF32-E97B-43DE-94A0-E533D446856D.jpeg158.4 KB · Views: 4
 -
 32D8ACA6-25F4-4C7B-9A42-225A4907A8BD.jpeg102.3 KB · Views: 5
 -
 162C4284-009C-4B39-8DD6-F2CD66076D8D.jpeg92.3 KB · Views: 5
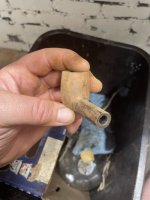
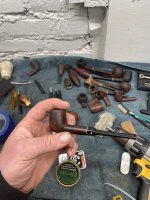
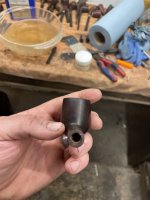
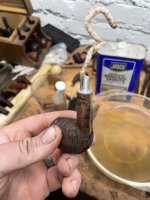
This one had a cracked stemmel as well, but trying to get the epoxy off, I am sanding down the rustification. I was thinking a dremmel with a wood bit to make the lines deeper? It’s a Guardsman
Attachments

Yep. Those all make good sense. I’ve done similarly when addressing burnouts by drilling them out and plugging them. I’m at the point now, though, that if I see a break or burnout I just move on to another pipe.
For me, the return from sale won’t match the investment in time or $$ for that kind of intervention.
For me, the return from sale won’t match the investment in time or $$ for that kind of intervention.