Restoring and Repairing a Peterson's Special Horn - Republic Era

Log in

SmokingPipes.com Updates

Watch for Updates Twice a Week

PipesMagazine Approved Sponsor

PipesMagazine Approved Sponsor

PipesMagazine Approved Sponsor

PipesMagazine Approved Sponsor

PipesMagazine Approved Sponsor

phdaemon

Lurker
May 31, 2022
46
79
Hello all. Hopefully, this post can help other people that are looking to restore and repair pipes. I've gotten pretty decent at doing so, so I'll be using this thread to document the progress of restoring this pipe I just got at an auction.

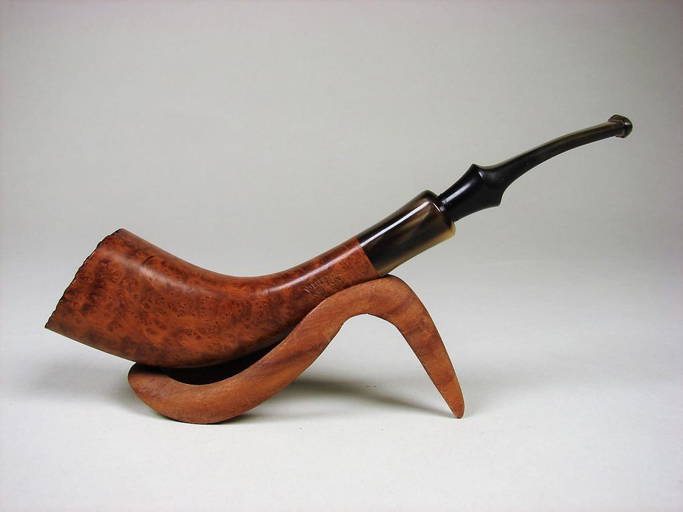
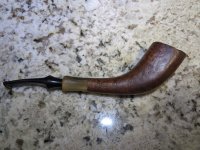
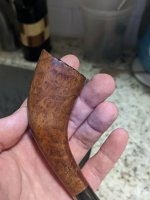
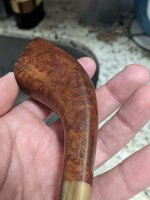
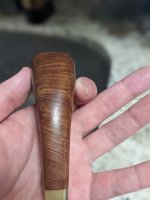
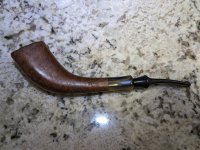
This pipe has a lot of potential. The grain is beautiful, but a bit dull. The goal during restoration will be the following:

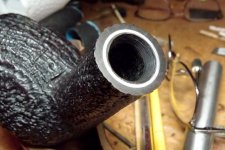
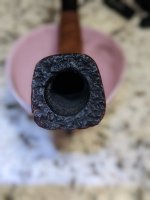
  • Remove all caking from chamber, bring the chamber back to briar
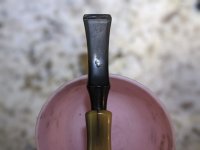
  • Remove oxidation from stem
  • Fix bite marks on stem
  • Polish stem
  • Fix crack on horn
  • Disinfect + Remove any ghosts
  • Create a pre-carbonization layer
  • Re-vitalize stummel
  • Polish
I'll try to create a post for each step in this thread and hopefully, others can maybe use it as a reference, if they like.

Thanks!
 

Attachments

  • PXL_20220930_010322071.PORTRAIT.jpg
    PXL_20220930_010322071.PORTRAIT.jpg
    163.7 KB · Views: 28
  • PXL_20220930_010844939.PORTRAIT.jpg
    PXL_20220930_010844939.PORTRAIT.jpg
    85.8 KB · Views: 25
  • PXL_20220930_010852551.PORTRAIT.jpg
    PXL_20220930_010852551.PORTRAIT.jpg
    104.2 KB · Views: 22
  • PXL_20220930_010855993.PORTRAIT.jpg
    PXL_20220930_010855993.PORTRAIT.jpg
    74.8 KB · Views: 23
  • PXL_20220930_010408391.PORTRAIT.jpg
    PXL_20220930_010408391.PORTRAIT.jpg
    55.7 KB · Views: 23
  • PXL_20220930_010351909.PORTRAIT.jpg
    PXL_20220930_010351909.PORTRAIT.jpg
    66.3 KB · Views: 24
  • PXL_20220930_010328433.PORTRAIT.jpg
    PXL_20220930_010328433.PORTRAIT.jpg
    165.3 KB · Views: 28

phdaemon

Lurker
May 31, 2022
46
79
Stem restoration steps so far:

1. Ream the chamber and remove as much cake as possible without scratching up much of the chamber.PXL_20220930_015717808.PORTRAIT.jpg

2. Using a sanding drum, manually sand off as much of the carbonization as you can, without damaging the chamber or making it uneven.

PXL_20220930_020628735.PORTRAIT.jpg

3. Clean the chamber using alcohol. Do not get any alcohol on the outside of the stummel.
PXL_20220930_021133655.PORTRAIT.jpg

4. Using a nylon brush and alcohol clean the inside of the shank. Do this until the brush does not come out dirty any more. You'll end up using a few bowls of alcohol so don't over fill whatever container you're using.
PXL_20220930_023005424.jpg

PXL_20220930_023045996.PORTRAIT.jpg

You can use a copper brush to remove harder-to-move debris and remove any build-up that is not removed by nylon brush. Do not dip the copper brush in alcohol.

PXL_20220930_023521436.PORTRAIT.jpg

Shank should be clean at this point.

PXL_20220930_024048404.jpg


5. Using a copper brush, remove any lava, charring, etc. This is especially done with a copper brush for rusticated/rough rims.

PXL_20220930_025116105.PORTRAIT.jpg


6. Clean the outside of the stummel. Do not get soap on the inside. Cleaning the inside of the chamber is a different step.
PXL_20220930_024854461.PORTRAIT.jpg


The next steps will be fixing the crack in the horn, probably will use some glue and dye for that.

Then disinfecting the inside of the pipe with a retort (high proof grain alcohol vapor).

After that, I'll get to work on the stem.

I will follow up with posts on that progress.
 
Last edited:

ssjones

Moderator
Staff member
May 11, 2011
18,428
11,336
Maryland
postimg.cc
I'm also use the nylon/brass brush for cleaning the shank. I'm always surprised at folks that use 100 pipe cleaners vs one brush dipped in alcohol, then wiped clean. I also scrunch up a paper towel and work it in with the bit on my reamer, to get that final hard deposit at the bowl end of the shank (at the draft hole).
 

phdaemon

Lurker
May 31, 2022
46
79
NOTE: Please use PPE during restoring a pipe, but especially so when using a retort. Eye protection and a mask go a long way here.

I stand the horn to allow it to be porous in preparation for the next step and wipe off any dust.

Now we can move on to the inside of the stummel.

For this, we use a retort.

I attach the hose directly to the horn on this pass, since sometimes ghosts like to hide in the shank (At a later pass I will also do it with the stem attached, to disinfect the stem).
PXL_20220930_093116080.jpg

I use a reflux to prevent condensation and steam from hitting the stummel (You can see the steam come out of the reflux). For heating, I simply use an alcohol burner.

PXL_20220930_093128656.jpgPXL_20220930_093105798.jpg

The end result of using a retort can be seen here:

PXL_20220930_093345268.jpg

Next steps, refresh the stummel by re-staining it (during this process I noticed that there was quite a bit of fading in the existing dye) then the stummel is ready for the finishing touches.
 
Last edited:

phdaemon

Lurker
May 31, 2022
46
79
Next we start staining.

I start with the horn and then move on to the stummel. The horn is sanded to allow it to absorb the dye.

I use black CY glue to cover the crack seen in this picture.

PXL_20220930_010408391.PORTRAIT (1).jpg

I use painter's tape to protect the stummel.

PXL_20220930_094204261.jpgPXL_20220930_094231868.PORTRAIT.jpg

The dye I use for the horn is the same that most people use for the rest of the pipe.

PXL_20221001_010156896.PORTRAIT.jpg

The USMC Black is for the horn and the light brown for the stummel.

Once applied, I let it set, and then clean off the excess.

When the horn is done, I cover the horn in painter's tape and then dye the stummel.

I set it with a lighter and wipe off the excess. Let it dry for some hours.

After this, I use a soft brush and "Restoration Balm" from LBE.

PXL_20221001_011201527.PORTRAIT.jpg

Now the stummel is ready for polish.
 

phdaemon

Lurker
May 31, 2022
46
79
For polishing, I use carnauba wax and a polishing wheel. I really like having that "glass" look on my pipes.

After polishing the entire pipe, here is the end result.

Before:

PXL_20220930_010852551.PORTRAIT.jpg

After:

PXL_20220930_131504189.PORTRAIT.jpg

Before:


PXL_20220930_010844939.PORTRAIT.jpg

After:

PXL_20220930_131520850.PORTRAIT.jpg

Before:

PXL_20220930_010351909.PORTRAIT.jpg

After:

PXL_20220930_131557442.PORTRAIT.jpg

Before:

PXL_20220930_010855993.PORTRAIT.jpg

After:

PXL_20220930_131533078.PORTRAIT.jpg


All in all, I think the stummel restoration is a success.

PXL_20220930_132513851.PORTRAIT.jpgPXL_20220930_132554676.PORTRAIT.jpg


Next step, is the stem. Currently, it is dipped in deoxidizing solution.

PXL_20220930_093940998.PORTRAIT.jpg

Will follow up with progress pictures.
 

georged

Lifer
Mar 7, 2013
5,539
14,252
Is the section of horn a slipped-over-a-tube-of-wood ornamental thing, or structural?
 

phdaemon

Lurker
May 31, 2022
46
79
Is the section of horn a slipped-over-a-tube-of-wood ornamental thing, or structural?
Looks to be structural. There's no metal tube visible. I posted a picture that shows an inside perspective in the OP.

It's not wood, it seems to be acrylic or some sort of animal material.

If it was over a metal tube then it could just be replaced, but separating it the way it is might crack the shank.

That's why I opted for glue and dye.
 

georged

Lifer
Mar 7, 2013
5,539
14,252
10-4

It's virtually certain to split again with use unless a reinforcing ring is countersunk into the face of it.
 

phdaemon

Lurker
May 31, 2022
46
79
10-4

It's virtually certain to split again with use unless a reinforcing ring is countersunk into the face of it.
Hmm, heat shouldn't get too far up there since the shank is long enough. But I'll keep an eye on it.

Thanks!
 

georged

Lifer
Mar 7, 2013
5,539
14,252
Hmm, heat shouldn't get too far up there since the shank is long enough. But I'll keep an eye on it.

Thanks!

Heat isn't (and wasn't) the problem.

It's sustained outward pressure plus irregularly applied non-axial torque.

Put another way, horn is intrinsically unstable and makes truly terrible load-bearing pipe parts.

Unless shielded from those forces (which boils down to being used only as eye candy), it will fail sooner or later.

Hence the reinforcing ring.
 

Attachments

  • P5136348.jpg
    P5136348.jpg
    114.5 KB · Views: 6
  • Like
Reactions: phdaemon

phdaemon

Lurker
May 31, 2022
46
79
Heat isn't (and wasn't) the problem.

It's sustained outward pressure plus irregularly applied non-axial torque.

Put another way, horn is intrinsically unstable and makes truly terrible load-bearing pipe parts.

Unless shielded from those forces (which boils down to being used only as eye candy), it will fail sooner or later.

Hence the reinforcing ring.
Ahhh, that makes a lot of sense.

I'll look into something more permanent for a solution then. I've never installed a ring myself so I'll possibly look into that.

Thank you!
 

ssjones

Moderator
Staff member
May 11, 2011
18,428
11,336
Maryland
postimg.cc
That is a very interesting Peterson. Marty Pulvers sold one in 2021, and includes a bit of history on the one-year only pipe:

 
  • Like
Reactions: phdaemon

phdaemon

Lurker
May 31, 2022
46
79
@ssjones Nice find!

looks like the horn on that one has also seen some tough times.

I got this one for a lot cheaper than that, but as you saw in the original pictures, the condition was rough.
In any case, looking forward to adding it to my collection. I got quite a few petes, some of them pretty rare, I guess this one is one now too.