Stem button/lip

Log in

SmokingPipes.com Updates

Watch for Updates Twice a Week

PipesMagazine Approved Sponsor

PipesMagazine Approved Sponsor

PipesMagazine Approved Sponsor

PipesMagazine Approved Sponsor

PipesMagazine Approved Sponsor

Status
Not open for further replies.

unadoptedlamp

Part of the Furniture Now
Mar 19, 2014
742
1,368
Hey all,
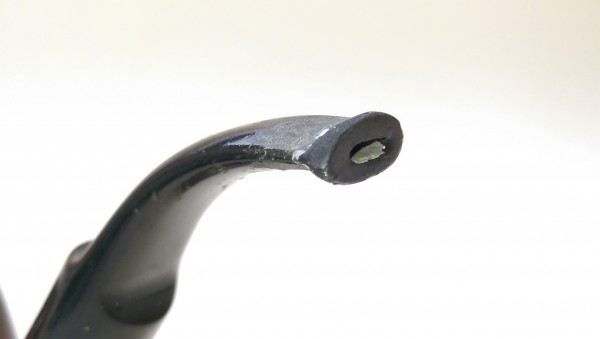
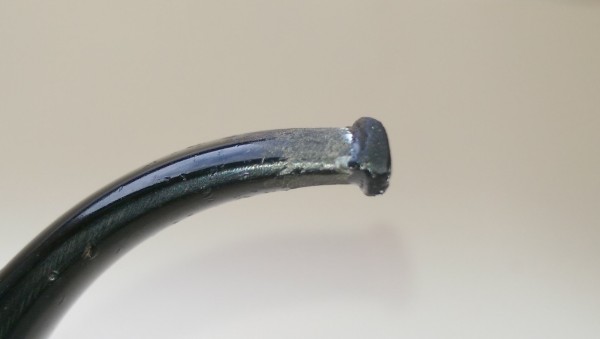
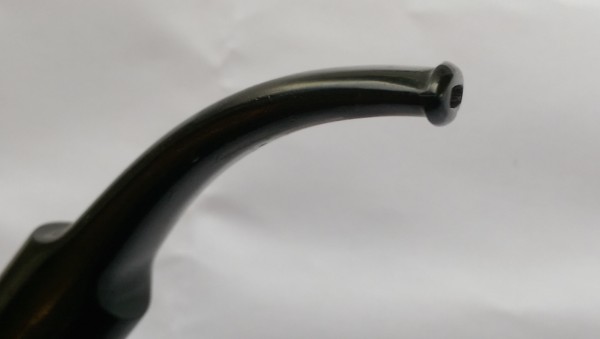
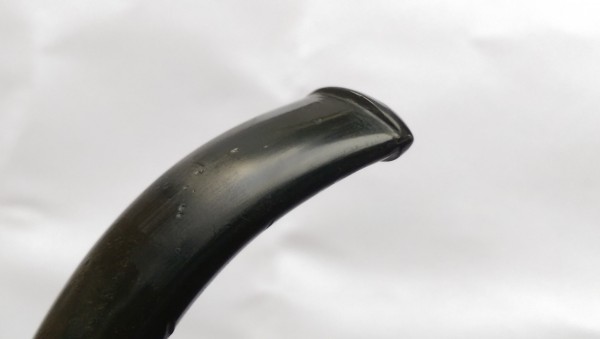
Does anyone have any tips for adding a button or lip to a pipe stem? I bought an old estate years ago that was otherwise fine. The button was chewed in the middle, so I sanded it off to make it passable and forgot about it. I've just found it in a drawer and I like the look, but it has an odd mouth feel to me without the button. Stem appears to be vulcanite.
I was thinking about using some electrical tape (cut into 1/4 or so) to go around the end a couple of times, then adding crazy glue on top to later sand smooth and taper for a good feel.
Currently in Brazil, so access to pipe repair folks is limited, I believe. If anyone has any tips for how it might be possible to build up a decent button, I'm curious to know them!
Happy puffing!
Also, slightly off topic, if anyone knows of a decent pipe tobacco source here, I'm looking. Sao Paulo is my main access, and I know a decent cigar store, but for pipe tobacco, I've never had luck outside of the voodoo shops or insanely overpriced Captain Black (from the cigar store) that I wouldn't buy anyway. Local blends that are not composed of burley and aromatic juice (no offence) are of particular interest, but I've never seen them. Would be amazing to find a range of virginia plugs, ropes, flakes or something along those lines. Just tossing that out there on the off chance somebody knows something I haven't been able to find in nearly a decade of casual looking.


jpmcwjr

Moderator
Staff member
May 12, 2015
24,697
27,286
Carmel Valley, CA
Similar with an old meer- the button broke off. Sanded it smooth, but it would tend to slip out of the teeth. I put a thin line of super glue on top and bottom to make an invisible (but tiny) sort of button. Works all right, and doesn't look squarmy.


unadoptedlamp

Part of the Furniture Now
Mar 19, 2014
742
1,368
Thanks for the tips guys.
I've never tried the softies before. Doubtful they're easy to pick up here, so I guess I'll give the glue a try without the electrical tape to see how it goes. Maybe a softie or a new stem altogether when I'm back North.
It's not slipping so much, since I don't clench much... I just can't get over the mouth feel without a lip. Completely throws off the experience and I had never appreciated just how big a role such a small detail plays in the pipe experience until it was gone.


eggrollpiper

Can't Leave
Jul 27, 2018
378
38
You can use heat shrink wire wrap pieces as a make shift softee bit. Several layers could build it up a bit. I would try to MacGyver something until I could get a new stem. I do t know if you've ever seen the falcon dental bit but it's like a flat piece of plastic at the end that hooks onto your teeth. Google that and mb u can glue a piece of plastic to the tip and cut down and slot. Just a thought.


osiris01

Starting to Get Obsessed
Dec 21, 2017
146
31
I've done this a few times and with a bit of practice, you can make a pretty good job of it. I use the high viscosity black CA and as jmpc.... says, just put a line top and bottom. I find that building it up slowly works better because it does shrink a bit - after each application I wait until it's cured and gently file the surface smooth, reapply etc. When it has built up to a decent height, reshape it with some needle files. If looks matter, do it on an old beater to work out what works best for you. You can make it practically invisible - the glue buffs up perfectly.


unadoptedlamp

Part of the Furniture Now
Mar 19, 2014
742
1,368
Thanks for the tip osiris, I think I'll be giving this a shot. For me, looks are important. I guess if I completely mess it up, I'll just send it in to somebody who is competent enough to make a new stem for me. In the meantime, having the button is important. It's just too smooth and awkward feeling in the mouth without it!


unadoptedlamp

Part of the Furniture Now
Mar 19, 2014
742
1,368
It will take me a couple of days to get some crazy glue, but when I do, I'll put a line or two on the stem and revive this one to post some pictures of the result.
The pipe is a Stanwell "Hand made in Denmark" that I got from a flea market in Germany for $5. Great shape, except the stem. It was also in a sandblast... which I sanded smooth because I thought the grain looked intriguing. It does have nice birdseye. Just need to fix that stem or have someone make me a new one...


osiris01

Starting to Get Obsessed
Dec 21, 2017
146
31
Since there was a request for some images, I thought I'd put a few up of one I've just done. Still needs tarting up, but the basic lip is done. This was done quickly, but if you spend a bit more time on it, you can get them almost perfect. I forgot to take photos until after I'd build the lip up, but the original was comprehensively smashed up so I just hacked about 8 mm off. Shaping and slot was done using various needle files.
Before:
1-600x339.jpg

2-600x339.jpg

After:
3-600x339.jpg

4-600x339.jpg


May 9, 2018
1,687
86
Raleigh, NC
Beautiful work Osiris! :clap: Absolutely splendid! I had to do some work like that one once before. Just have to make sure the hole is really blocked off from the epoxy or you could close it up. A Dremel and a good tip could clean it up if it gets too clogged though. Really nice work though!


osiris01

Starting to Get Obsessed
Dec 21, 2017
146
31
That's very kind, thank you. I prefer the high viscosity black CA than standard epoxy (largely because I know nothing about epoxy), but I find it blends in better and has better holding power than products like Milliput. Pipe cleaners smeared in Vaseline will prevent gluing up the slot. Ideally what I'm looking for is a Dremel cutting disc that's about 2 mm thick to cut a neater slot, but I haven't been able to find one thick enough, (although since I don't often clench, I'm fairly easy on bits and only have to do this for beaten up estates). This is a John Redman that looks like it's been run over by a truck, but it has a good feel to it and I don't know much about his pipes, so I thought it worth the effort. Going to fire it up in about 10 mins to see if it warrants the full refurb treatment.


osiris01

Starting to Get Obsessed
Dec 21, 2017
146
31
Thanks Jesse. I didn't really finish the post very well, did I?. I use a 40 grit sanding roll and drag the smooth surface across it with a fair bit of weight on top of it (diagonally, once left to right and once right to left) and it produces deep scores in the vulcanite. A change I have made to the process is not waiting for the glue to fully cure before applying another layer. In my humidity, it take about 12 hrs to fully cure, but I've found if I leave 2 hrs between layers, the layers blend together better, both visually when you file through them, and strength-wise. Over time it may weaken, but filing out the slot puts a lot of stress on the lip and has been the time when other epoxyies have failed.
I guess we'll see, but at the moment it feels absolutely rock solid and is hanging from my gob as I write. If, one day, I am left with just the button in my mouth and a burn hole in the carpet, I'll update this thread. But, as I said, I'm not hard on stems; it may be a different story for habitual chompers.
Cheers,
Geoff

 
May 9, 2018
1,687
86
Raleigh, NC
To eliminate the need for that filing inside the button hole, I followed another members guide of sorts and his tip was to cut up an old credit card or ID card or something that fits that description, lather it up with Vaseline and then stick that in the hole so that no epoxy/CA can build into it, unless you need it there to fill a void. That worked like a charm for mine, and then all I had was a very thin amount of it to sand off at the button end and kept me from having to jostle it about too much when sanding/polishing. Your case could be different from mine, but that's how I kept the hole free. I can't remember the type of epoxy I used, but the one you used does have a better sheen and color to it. May try that next time.


osiris01

Starting to Get Obsessed
Dec 21, 2017
146
31
Yes, if you're repairing the button, your method works a treat. I use a pointed needle file and coat it with vaseline and it works fine. In this case of course, there wasn't a slot left - I'd cut it off, it was just the bore which I had to open up into a slot, thus the filing. I watched a clip of someone making a stem and they used this Dremel disc to cut the slot - took him about 2 seconds and was perfect. Mine took about 20 mins (and is not perfect!)


osiris01

Starting to Get Obsessed
Dec 21, 2017
146
31
Oh, one more thing. I use the rubberized CA glue. I find the normal stuff is too hard - the rubberized CA is about the same hardness as vulcanite and easier on the teeth.

 
Status
Not open for further replies.