Green Pipe?

Log in

SmokingPipes.com Updates

New Cigars
1 Fresh Clarin Clay Pipe
120 Fresh Peterson Pipes
12 Fresh Ser Jacopo Pipes
2 Fresh Former Pipes

PipesMagazine Approved Sponsor

PipesMagazine Approved Sponsor

Drucquers Banner

PipesMagazine Approved Sponsor

PipesMagazine Approved Sponsor

PipesMagazine Approved Sponsor

Status
Not open for further replies.

addamsruspipe

Part of the Furniture Now
Dec 4, 2016
790
5,364
55
Albuquerque, NM
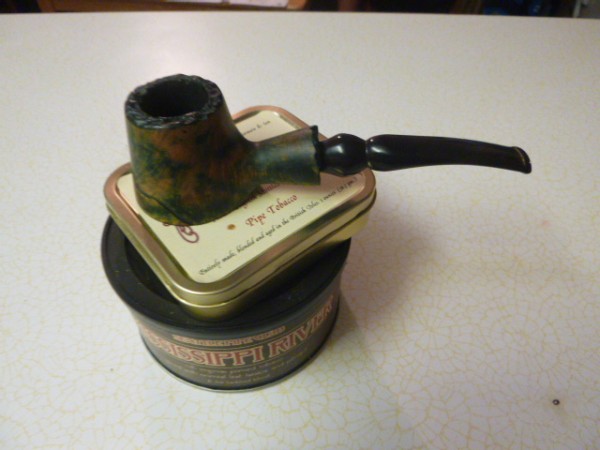
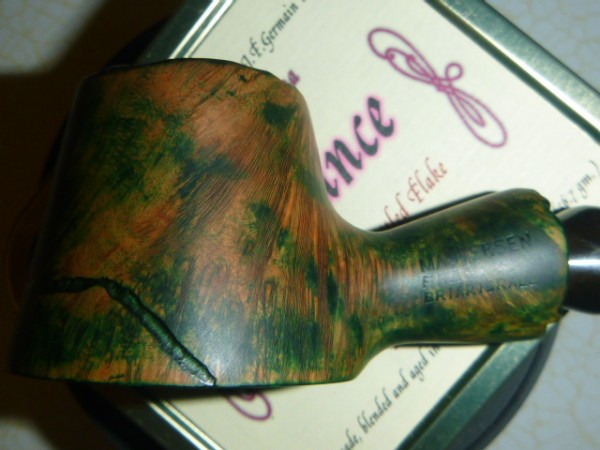
Evening all. So I have been playing around with some green dye to see how it would come out on a pipe. According to my girls my favorite colors are green, green, green and pink. They have also decreed that I must stain a pipe with all of the above mentioned colors. So here's my second attempt, the first was too awful to even take pictures of. So I stained it twice, then took it from 1200 grit down 800 then to 600. I then went back up to 800 and finished off at 1200. Then I used Halcyon to polish it up. I want to have the grain show but at the same time have some green. So this is what I have so far. Any opinions or suggestions would be nice for my next attempt.
p1300975-600x450.jpg
p1300979-600x450.jpg


clickklick

Lifer
May 5, 2014
1,700
212
I did something similar here

Your is very splotchy and muddied up. Is there a reason you went from 1200 grit, down, and then back up? Also, i don't see any pink in there. Are you trying to get pink?
For the one I made in the picture, I treated green as the base contrast stain. I sanded to 400 grit, did my green base coat, then sanded out scratches at 600 grit, leaving green only in the grain lines. The apply whatever overstain color, shellac wash and buff.


addamsruspipe

Part of the Furniture Now
Dec 4, 2016
790
5,364
55
Albuquerque, NM
The problem I have is that if I use 1200 it does not take off enough to show the grain through the green. So I moved down to 800 which started to show the grain but also took off some of the green. So I finally just went to 600 at that point since it was messed up already. What I want is a green pipe with the grain showing through. I'm guessing that I am just missing something basic. I am saving the pink for the next pipe.


clickklick

Lifer
May 5, 2014
1,700
212
Easiest way,

Sand with 120, apply green, sand with 220 until all scratches are out, most of the green will be gone. Apply green and sand with 320, again apply green and sand with 400. Finally stain green again and lightly sand to an even color with 600 grit. After 600 grit your wasting your time going higher.


jasonmazzy

Might Stick Around
Jul 31, 2017
75
1
I know from staining hard maples and the like a proper soaking would allow the denser wood and the lighter wood to absorb the stain and the wetsand would buff it up removing some stain from the dense and leaving more in the soft and give you a more 3d picture of the grain. look up alinine dye on maple top


clickklick

Lifer
May 5, 2014
1,700
212
While that may work for maple, you don't want to use the same process for briar pipes.
The last thing you want is to soak the wood at the finishing stage as it will cause everything to swell, which means your shape profile, and fitment with the stem etc will be significantly off when it dries and the swelling goes down. Same with wet sanding the wood. You only wet sand the stem material and never close to the shank junction.
The minute you start wet sanding briar, it swells a bit, so you might wet sand it perfectly in line with the stem. . . but when it dries, it's not going to be perfect anymore and you'll end up having to take more material off the stem side to make up for the wood shrinkage.
Not that in the OPs example he is doing a flush fit stem, but it is considered best practice regardless.

 
Status
Not open for further replies.